Get started
Collaboration
Spaces
Spaces organize all of the links, files, notes, and tasks you need for a project in one place.
If you choose to enable tab management in Settings, you can also organize your tabs by space.
- Create a space
- Switch between resources, notes, and tasks
- Add resources, notes, and tasks to a space
- Add tabs to a space
- Add or edit property fields within a space
- Toggle split view
- Share a space
- Archive a space
- Delete a space
- Organize spaces into sections
Create a space
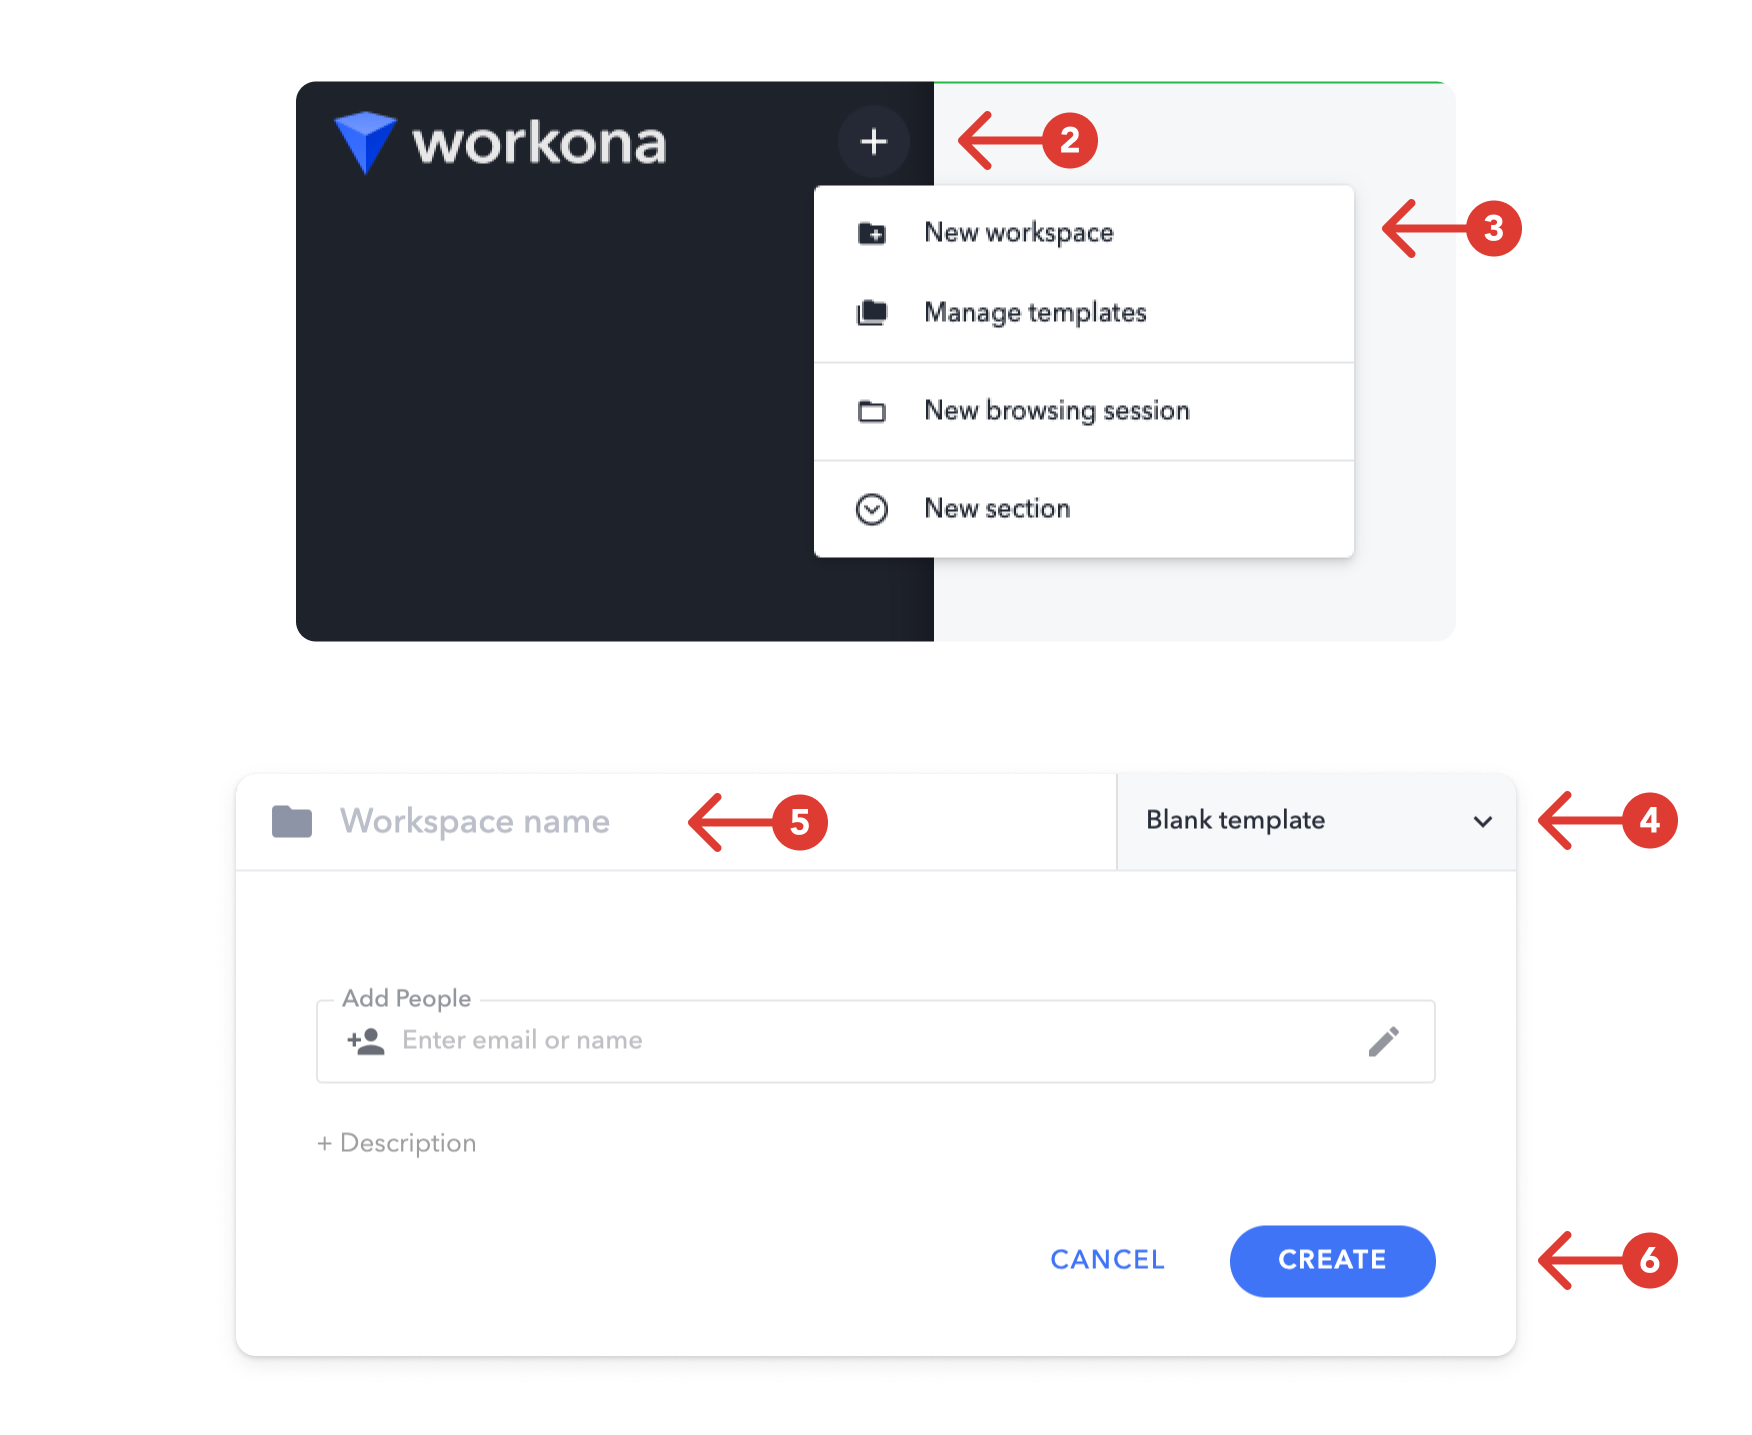
- Open Workona.
- Click the
+button at the top of the sidebar. - Click
New space. - Optionally, click the drop-down menu to select a space template as a prebuilt starting point.
- Type in a space name.
- Click
Createor press the RETURN key (ENTER on Windows).
Create within a section directly
To create a space within a specific section, click the + button that appears to the right of the section name when you hover over it.
Switch between resources, notes, and tasks

- Open a space.
- Switch between the Resources view, Notes view, and Tasks view by clicking the links for each that appear under the space title.
Add resources, notes, and tasks to a space

- Open a space.
- Click the blue
+button in the bottom-right of the screen to add resources (e.g. links & files), notes, or tasks to a space. - You can also add resources, notes, or tasks directly to a specific section of content by clicking the
+in the upper-right of the section.
What's shared with project collaborators?
Resources, notes, and tasks you add to shared spaces will be shared with space collaborators by default. Collaborators won't see your tabs or other private content.
Add tabs to a space

- Open a space.
- If you have tab management enabled, adding tabs to a space is as simple as opening a browser tab like you normally would.
- You can easily view or manage the current tabs in the space from within the Tabs view.
- All tabs within spaces are constantly autosaved, so you can close the space and return to your previous tab session exactly as you left it.
Tabs are always private
Tabs are always private to you, so collaborators will never see the tabs you have open within shared spaces. If you want to share a tab, simply save it as a resource.
Add or edit property fields within a space
If you'd like to keep key info about a project top of mind, adding a property field to the project's space is the perfect solution.
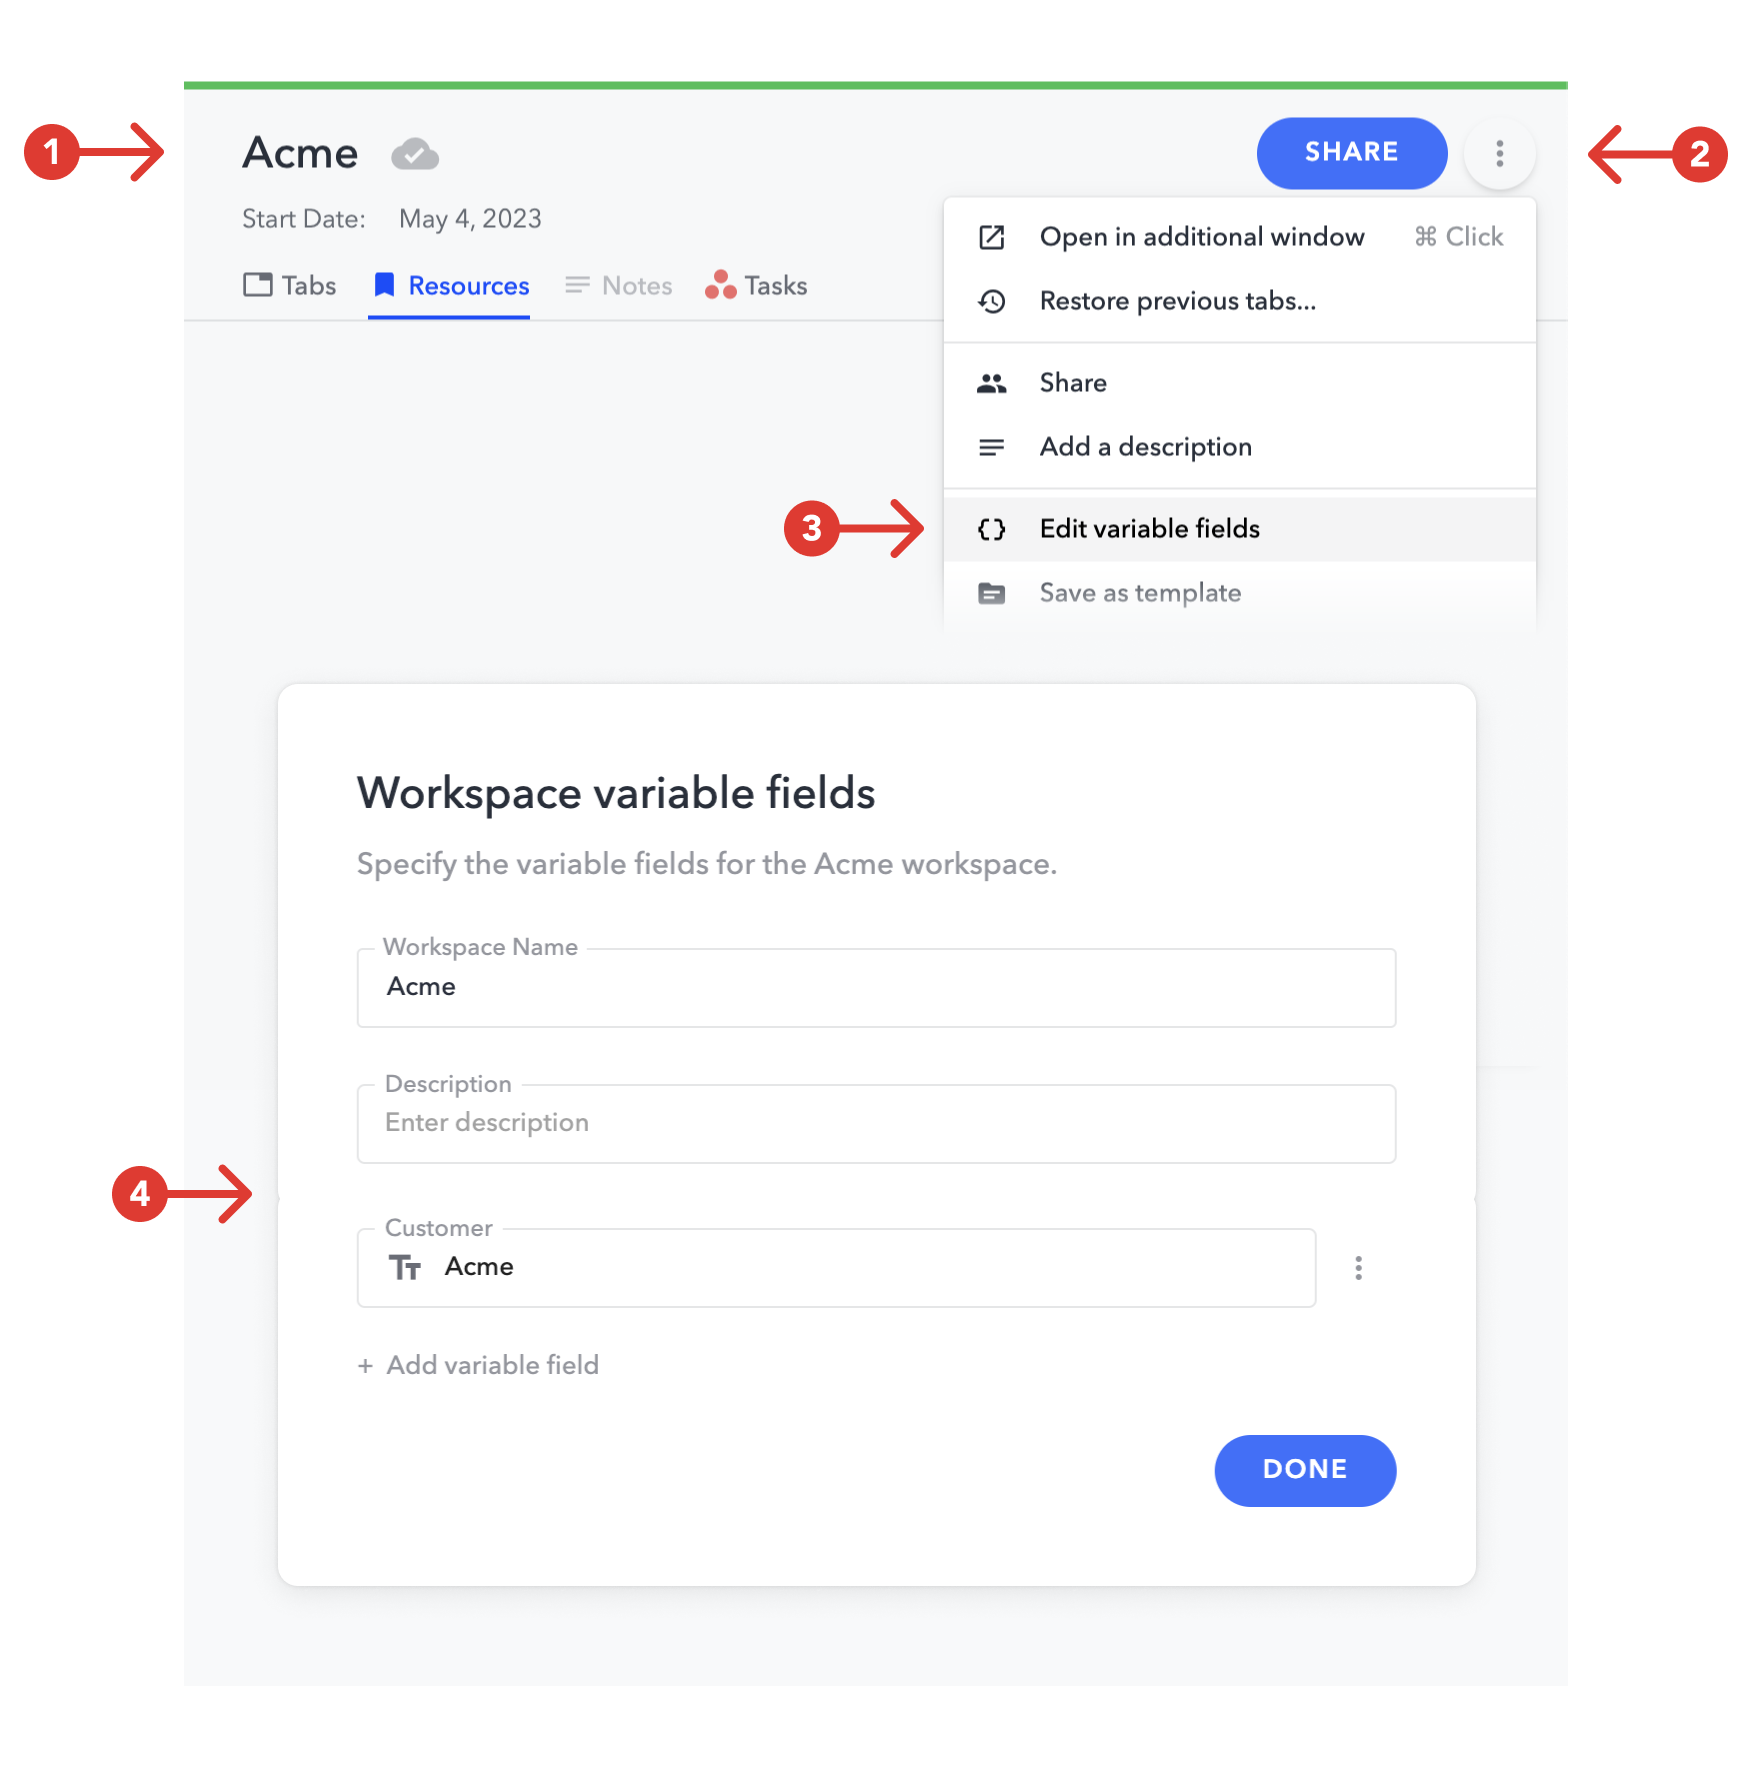
-
Open a space.
-
Click the
⋮button that appears in the top right of the space. -
Click
Add property fieldorEdit property fields. -
Add or edit the space properties.
- Add a property field: Click
+ Add property field, then create or select a property. - Reorder a property field: Click the
⋮menu next to the field you want to reorder, then clickMove uporMove down. - Set property field values: Click into the field and enter the value.
- Show or hide a property field in the space header: Click the
⋮menu next to the field you want to show or hide, then clickHide in space header. - Edit a property field's label: Click the
⋮menu next to the field you want to edit, then clickEdit property. Note that any updates to the property's label will be applied to all locations the property has been used. - Remove a property field: Click the
⋮menu next to the field you want to remove, then clickRemove from space.
- Add a property field: Click
Toggle split view
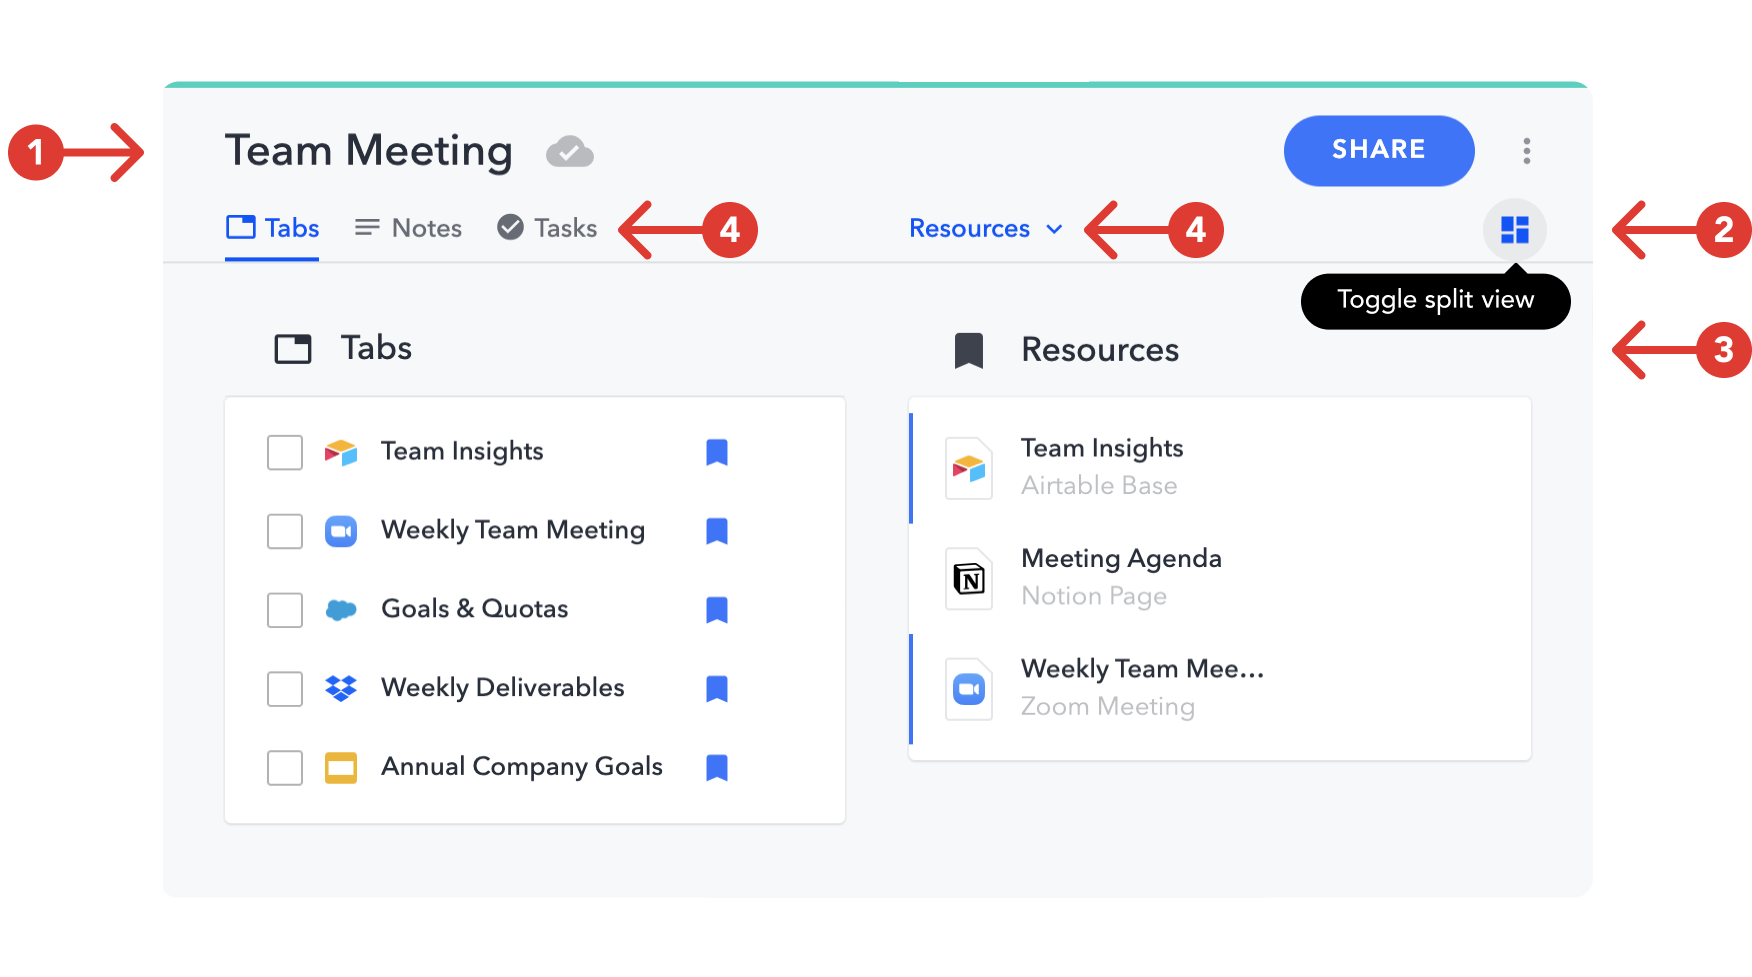
- Open a space.
- Click the
Toggle split viewbutton in the top-right of the screen (under theSharebutton). - Notice the space now shows two types of content (e.g. Resources and Tasks) at the same time.
- In the left column, switch views like you normally would. In the right column, switch views by clicking the dropdown menu in the header above the right column.
Open split view faster
CMD-click a view's name (CTRL-click on Windows) under the space title to open it in split view, or quickly switch the right column's view if split view is already enabled.
Share a space
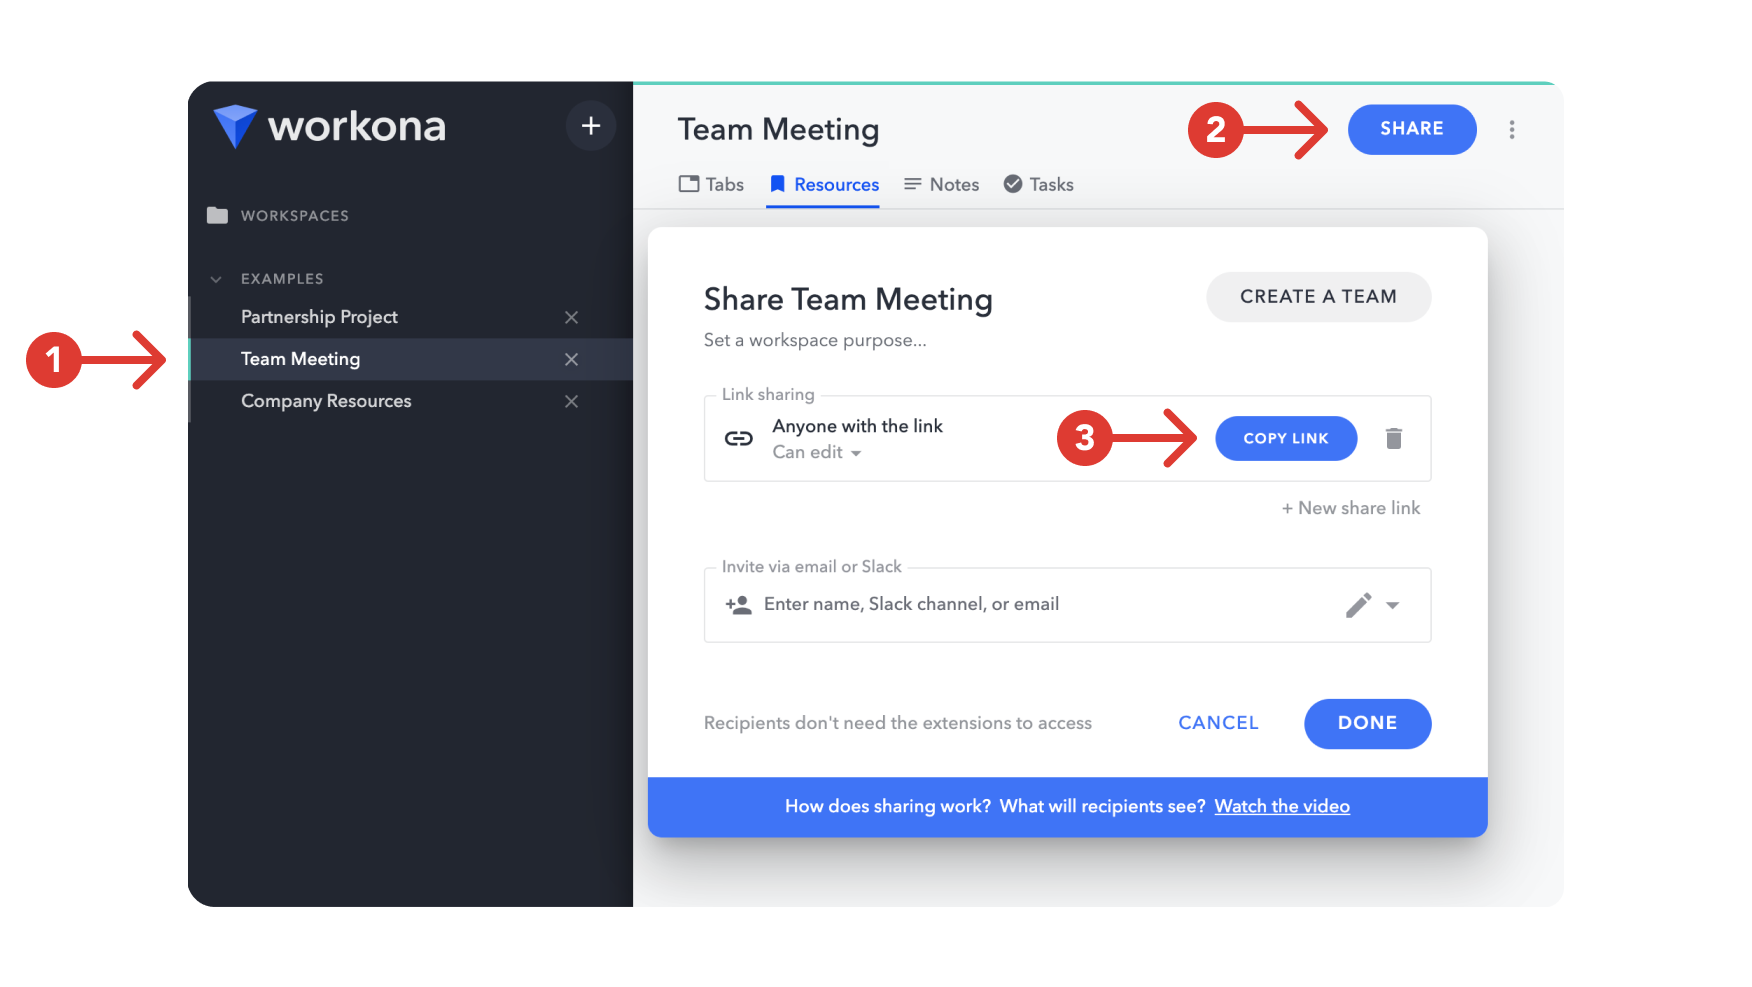
- Open a space.
- Click the
Sharebutton in the top-right of the screen. - Copy the share link and send it to collaborators or invite them by email.
Archive a space
Note: This feature is only available to users on the Pro plan

- Open Workona.
- Click the
⋮button that appears to the right of the space. - Click
Archive.
Tip: You can unarchive a space from the Archive at the bottom of the sidebar.
Delete a space
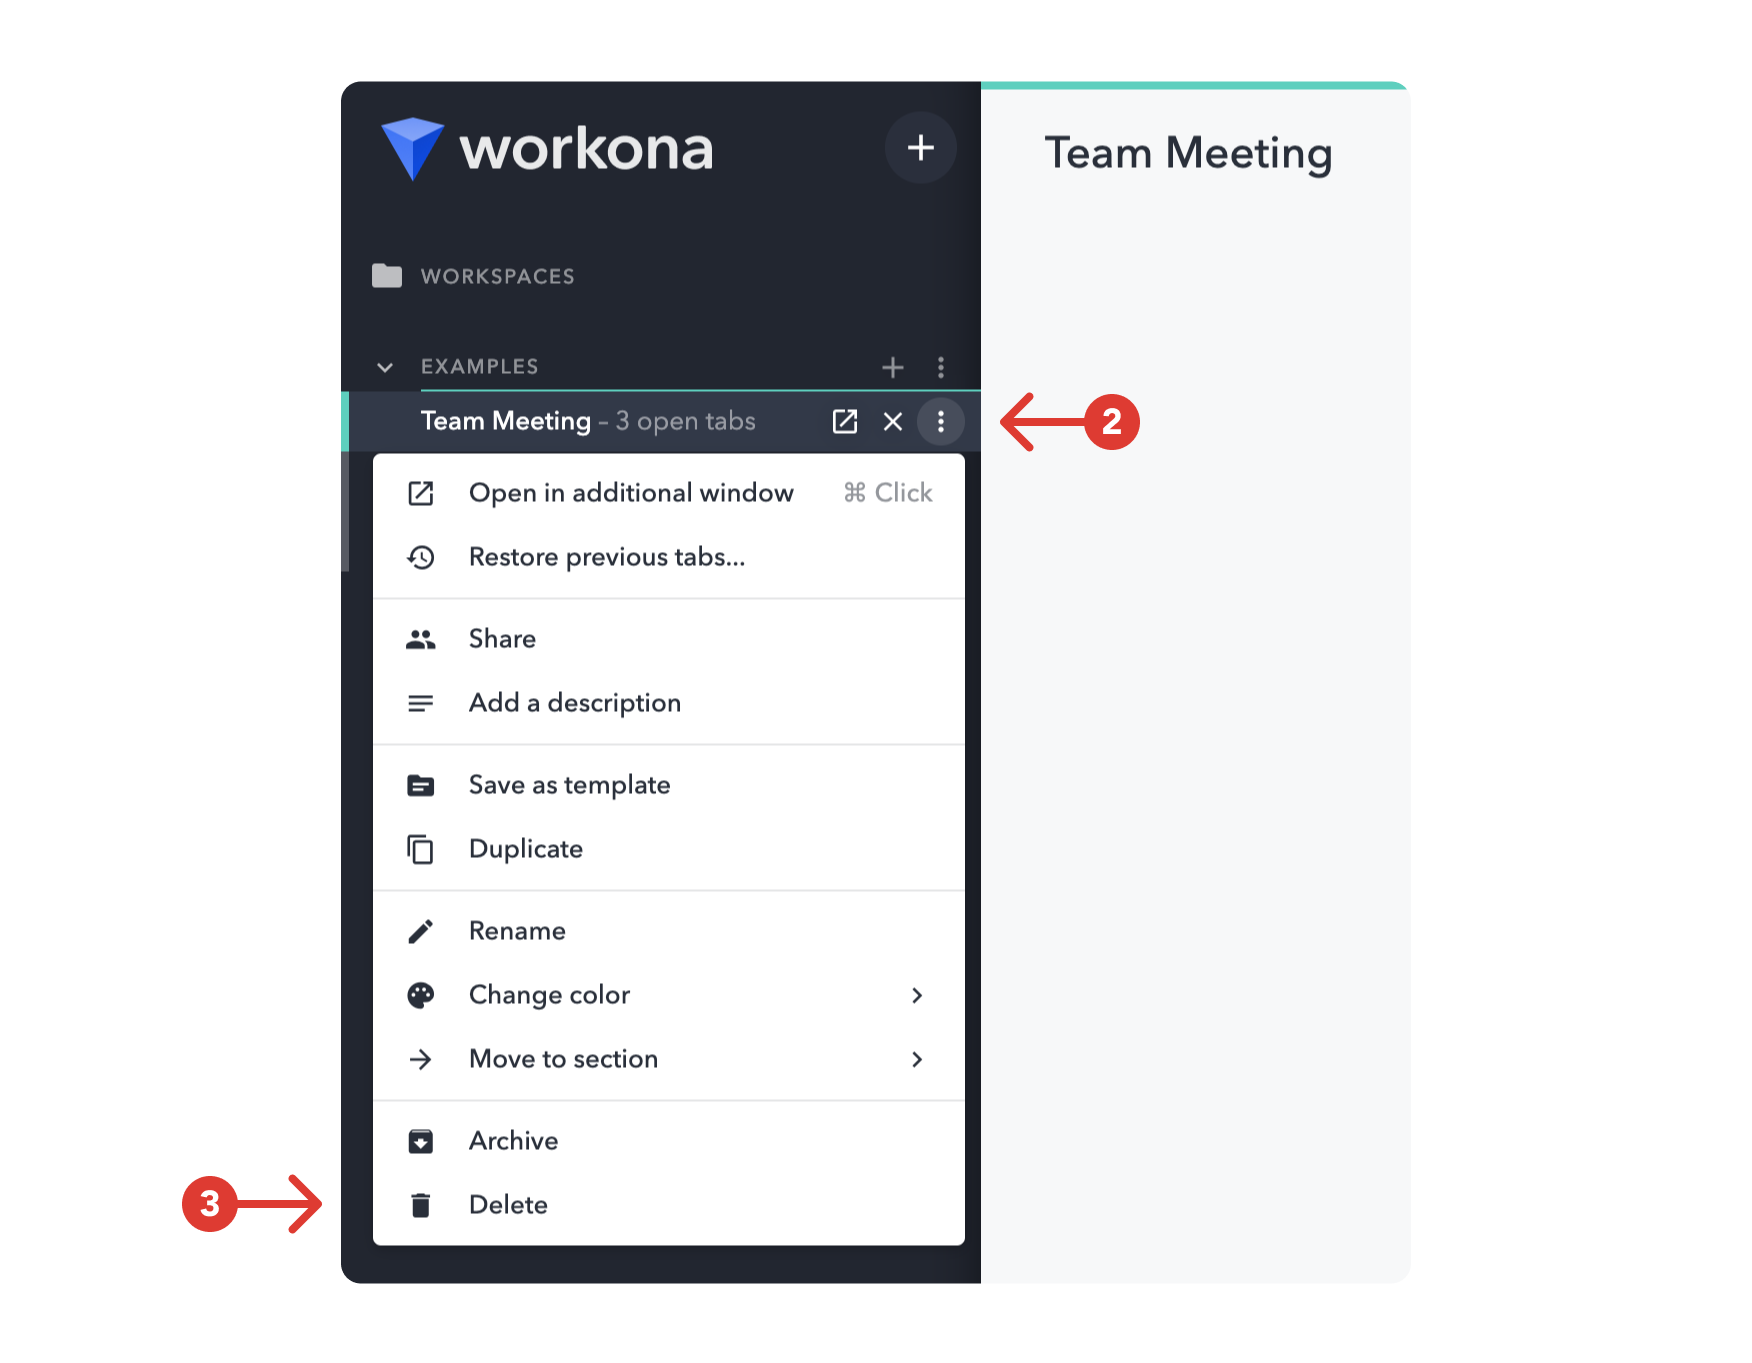
- Open Workona.
- Click the
⋮button that appears to the right of the space. - Click
Delete.
Organize spaces into sections
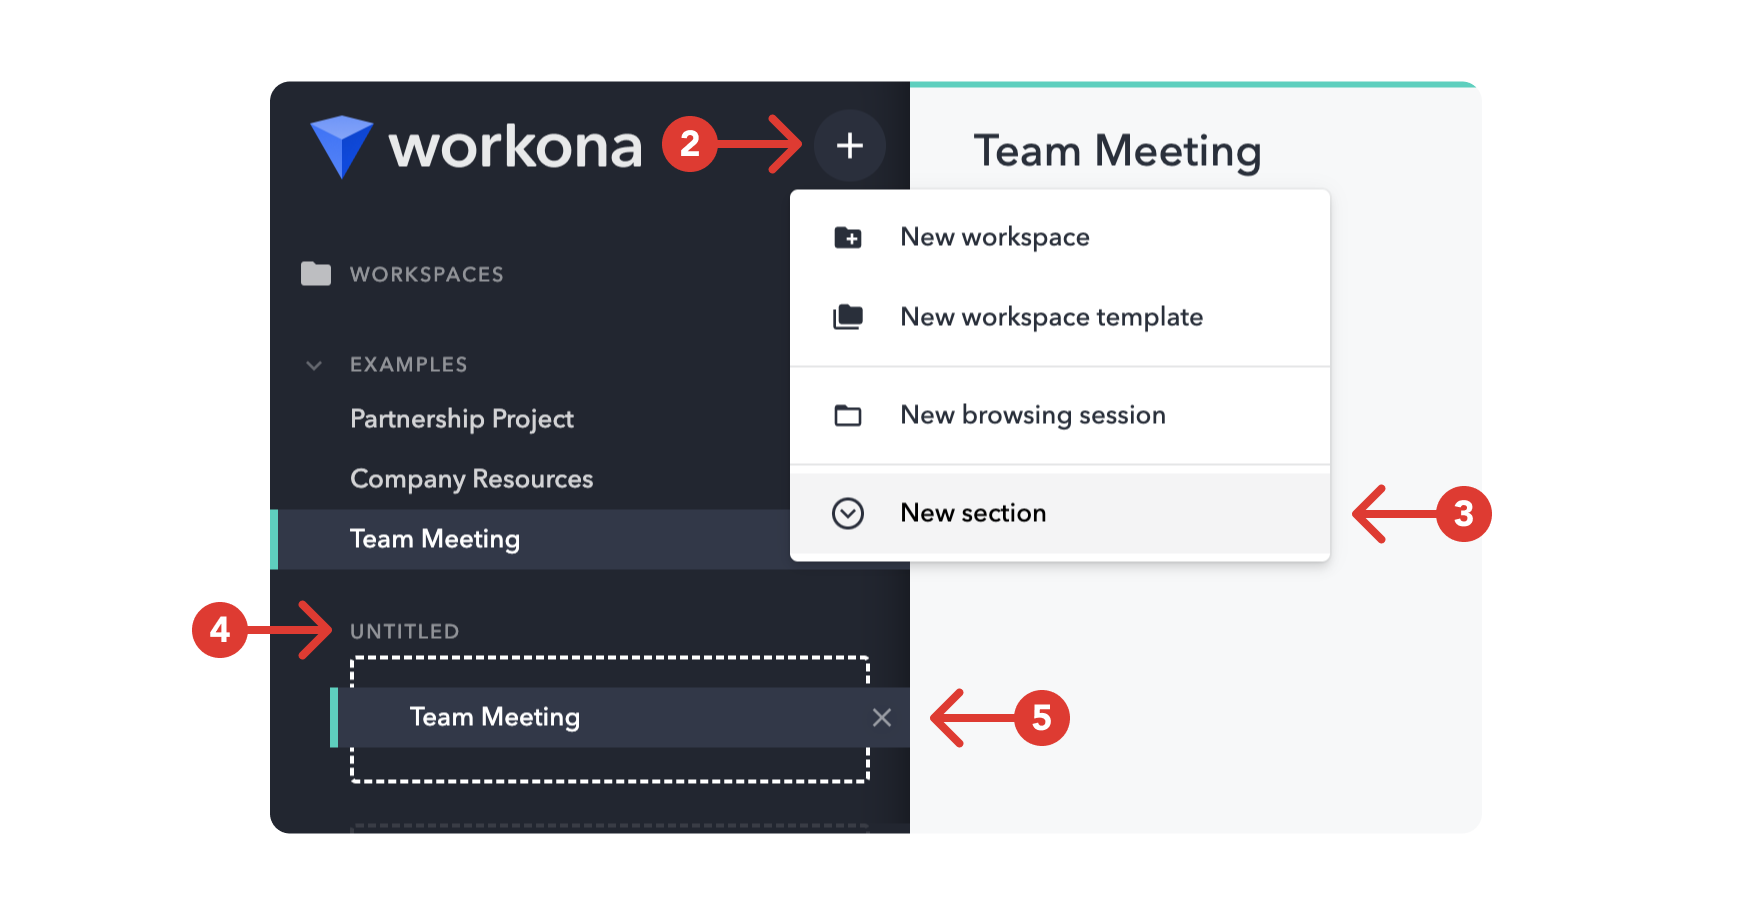
- Open Workona.
- Click the
+button above the sidebar. - Click
New section. - Type in a name.
- Drag and drop spaces into the section.
Rename or delete a section
Click the ⋮ button that appears to the right of the section in the sidebar, then click 'Rename' to rename or 'Delete' to delete.
Organize faster
To create a new section, drag spaces to the bottom of the sidebar and drop them in the dropzone that appears.