Get started
Collaboration
Space Template Automations
Once you've set up a space template for a certain type of project (e.g. New Client space, New Event space), you can use space template automations to automatically create the Google Docs, Sheets, Slides, Google Drive Folders, Slack Channels, task lists in apps like Asana & Trello, & other app objects that your team needs for each project.
For example, a common use case is:
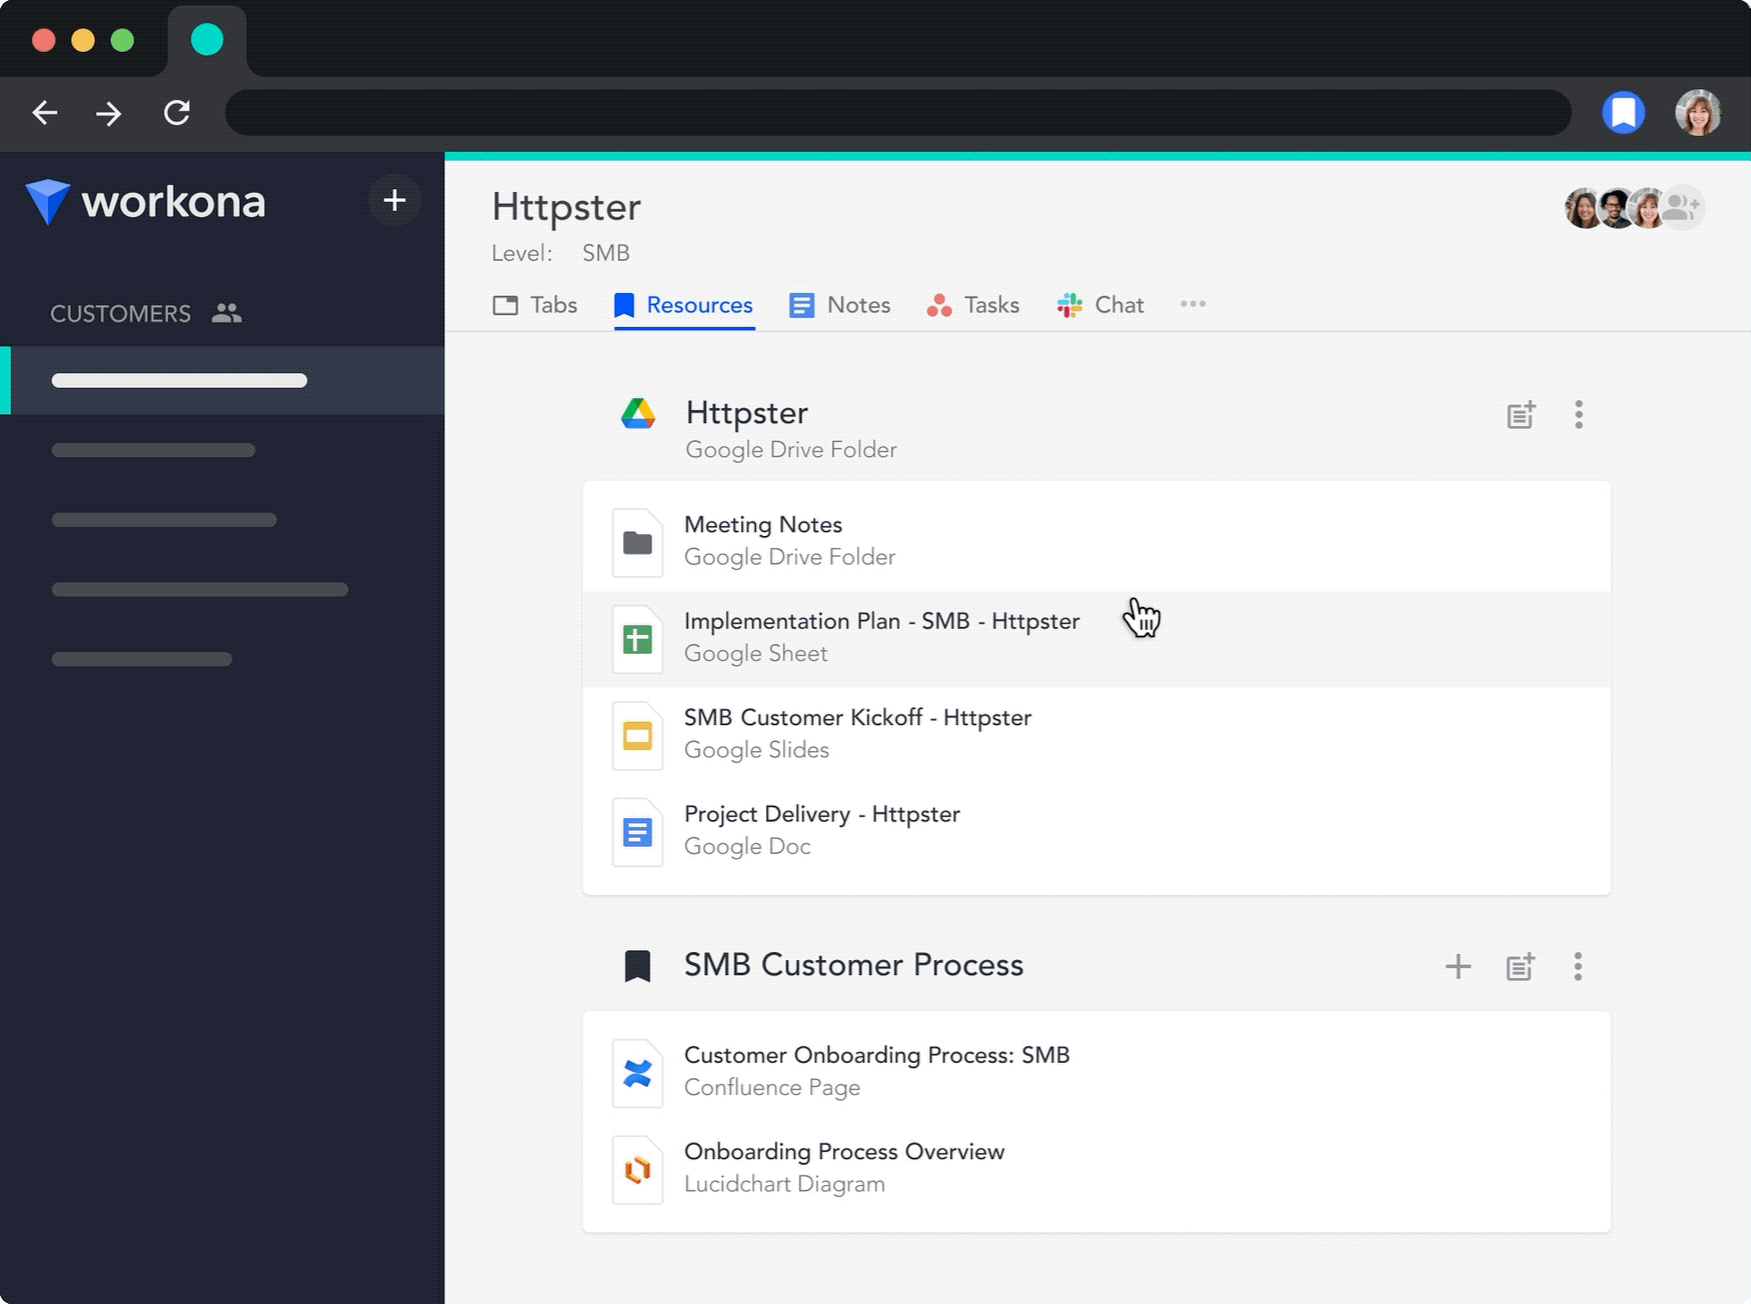
- Set up a Client space template to automatically create (or look up) the client's folder within Google Drive (e.g.
Shared Drive › Clients › {{Client}}) - Fill that folder with a standard set of Google docs and subfolders for each client (e.g. a doc called
Client Onboarding Plan - {{Client}}, a subfolder namedMeeting Notes - {{Client}}, etc.).
Space template automations aren't limited to creating new app objects; they can also look up existing app objects. Note: if we find an app object with the same name in the same location, we’ll use the existing object rather than creating a duplicate copy.
Once the app objects have been created or looked up, they will be saved to the generated space in exactly the same location every time. This consistent location helps your team find resources faster and complete routine tasks more easily.
- How space template automations work
- Supported app objects
- Create a space template automation
- Using properties within space template automations
- Build out a nested folder structure in Google Drive
- Use conditional logic to set up spaces differently based on their properties
- Add or edit dynamic resources
- Edit a space template automation
- Delete a space template automation
- Run space template automations during space creation
- Finish creating a pending resource within a space
How space template automations work
Space template automations help your team automatically create the Google Docs, Sheets, Slides, Google Drive Folders, Slack Channels, task lists in apps like Asana & Trello, & other app objects that you need for each project.
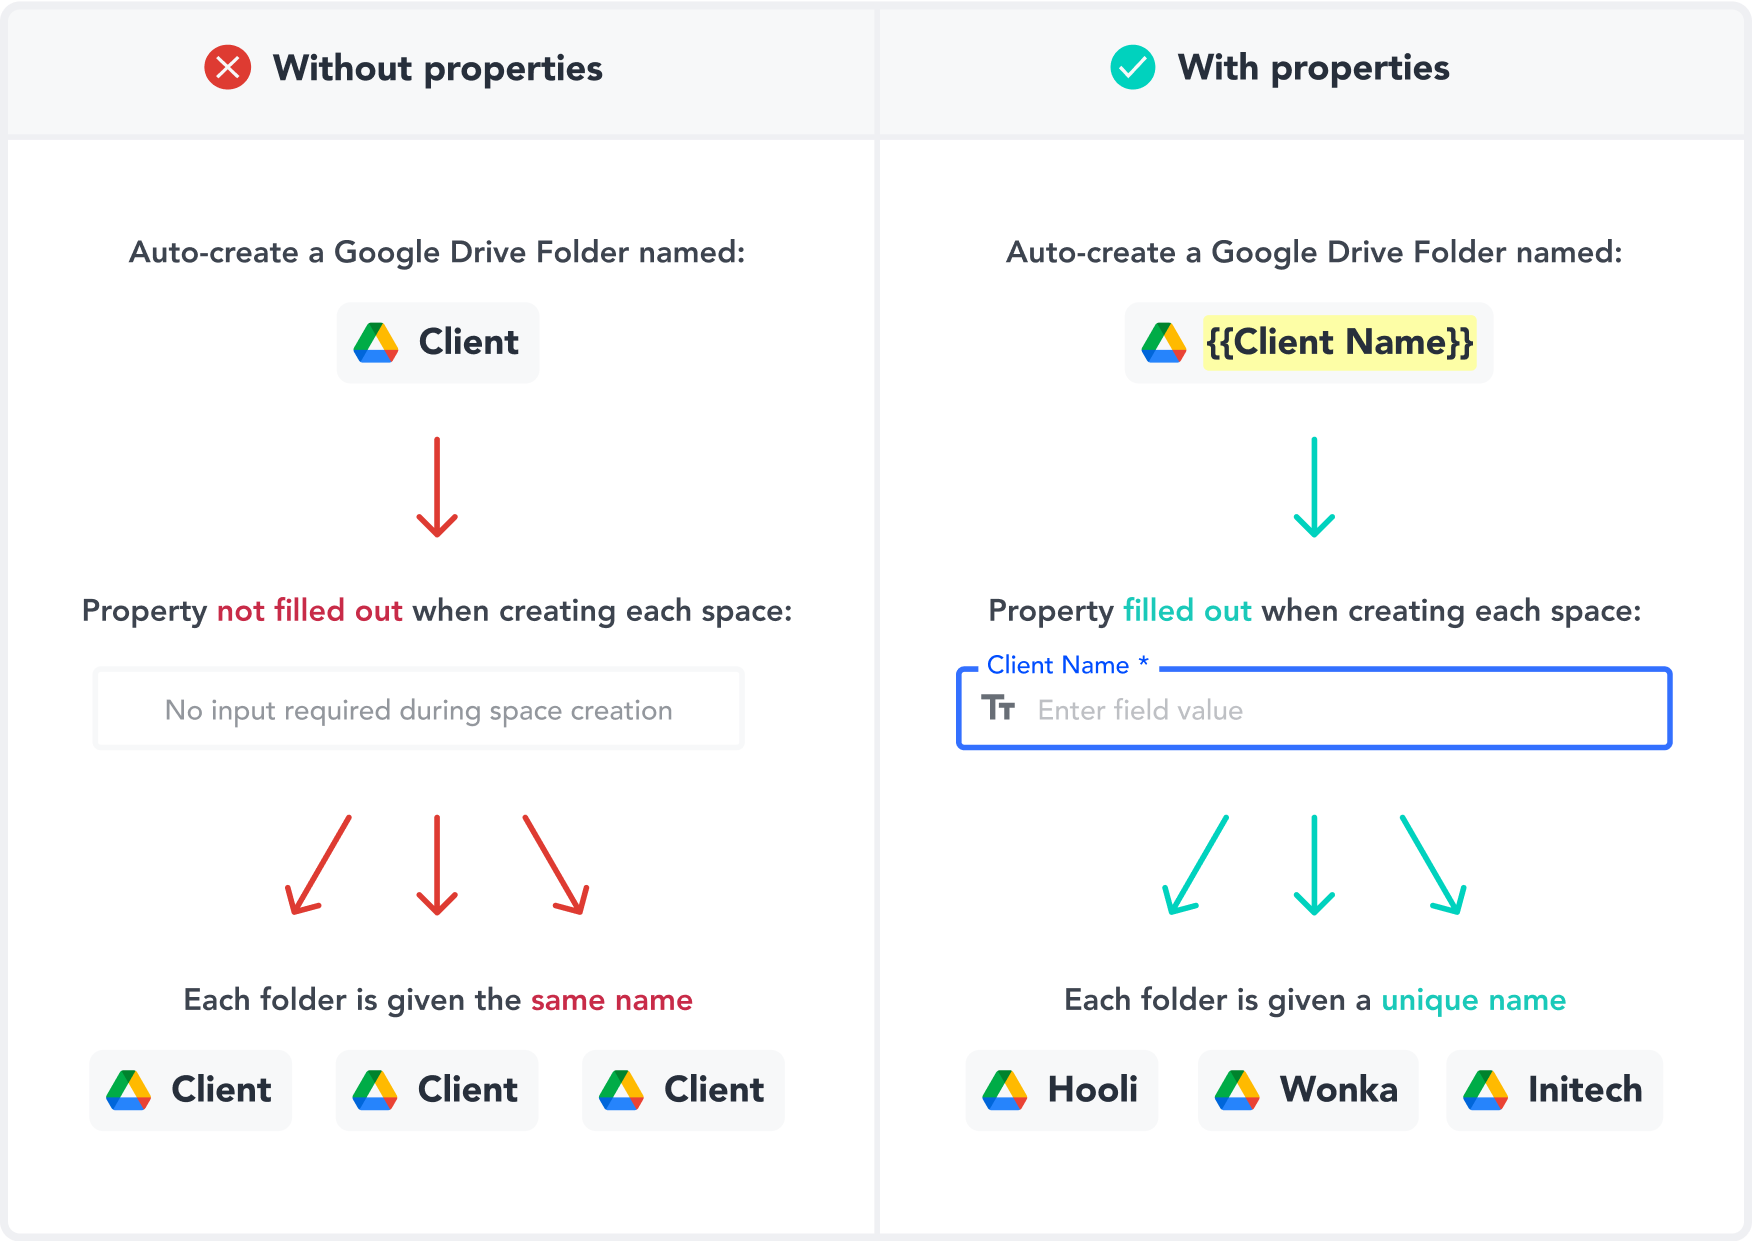
In most cases, properties should be inserted into the name field of the auto-created app objects so that each object will be given a unique name. For example, rather than specifying a doc name of Meeting Notes, specifying a doc name of Meeting Notes - {{Client}} will make the created docs much easier to find.
Three steps occur when a space template automation runs:
- A new space is created from a space template (this is the automation "trigger")
- An app object (e.g. Google Doc) is automatically created or looked up
- The created app object is saved to the created space
Example automation

Let's take a look at an example. Imagine we've set up an automation that auto-creates a Google Drive Folder called {{Client Name}}. Here are steps that this automation will take when it runs:
-
A new space is created from the
Client space template- The
{{Client Name}}property field will be filled out during the space creation flow. Let's imagineAcmeis entered as the client name.
- The
-
A Google Drive Folder is automatically created or looked up.
- The automation will first check to see if there is already a folder named
Acmein the specified location, and if there is, the existing folder will be used. - If no folder named
Acmeis found, then a folder namedAcmewill be created.
- The automation will first check to see if there is already a folder named
-
The client Google Drive Folder is saved to the client space.
- The
AcmeGoogle Drive Folder is saved to theAcmeclient space.
- The

You can set up multiple automations within a space template, and even chain them together to create nested folder/file structures. For example, you could create a subfolder within the {{Client Name}} folder (e.g. Meeting Notes), and then create a Google Doc within that subfolder (e.g. Kickoff Meeting Agenda - {{Client Name}}.
For more information on how to set up a nested folder structure in Google Drive, click here.
Each auto-created app object that you configure within your space template automations will be represented by a placeholder resource, so you can visualize exactly where the auto-created app objects will appear within the generated spaces.

Getting started with space templates
Once you've set up one or two space template automations, they become quite intuitive to work with. In under an hour, you'll be able to set up your team's dream digital work environment for executing on projects. As your team process evolves, your space template can easily evolve too. Just update the space template and your team will be running your new process for all new projects going forward.
In a sense, space templates are a physical manifestation of your current team processes — and thus serve as a canvas for your team to codify and iterate on those processes.
Give your team a more consistent, productive, & enjoyable workday by creating your first automation in a space template.
Supported app objects
Space template automations currently support the automatic creation or look up of the following app objects:
- Google Drive Folders
- Google Docs - supports doc templates
- Google Sheets - supports doc templates
- Google Slides - supports doc templates
- Slack Channels
- Asana Projects
- Trello Boards
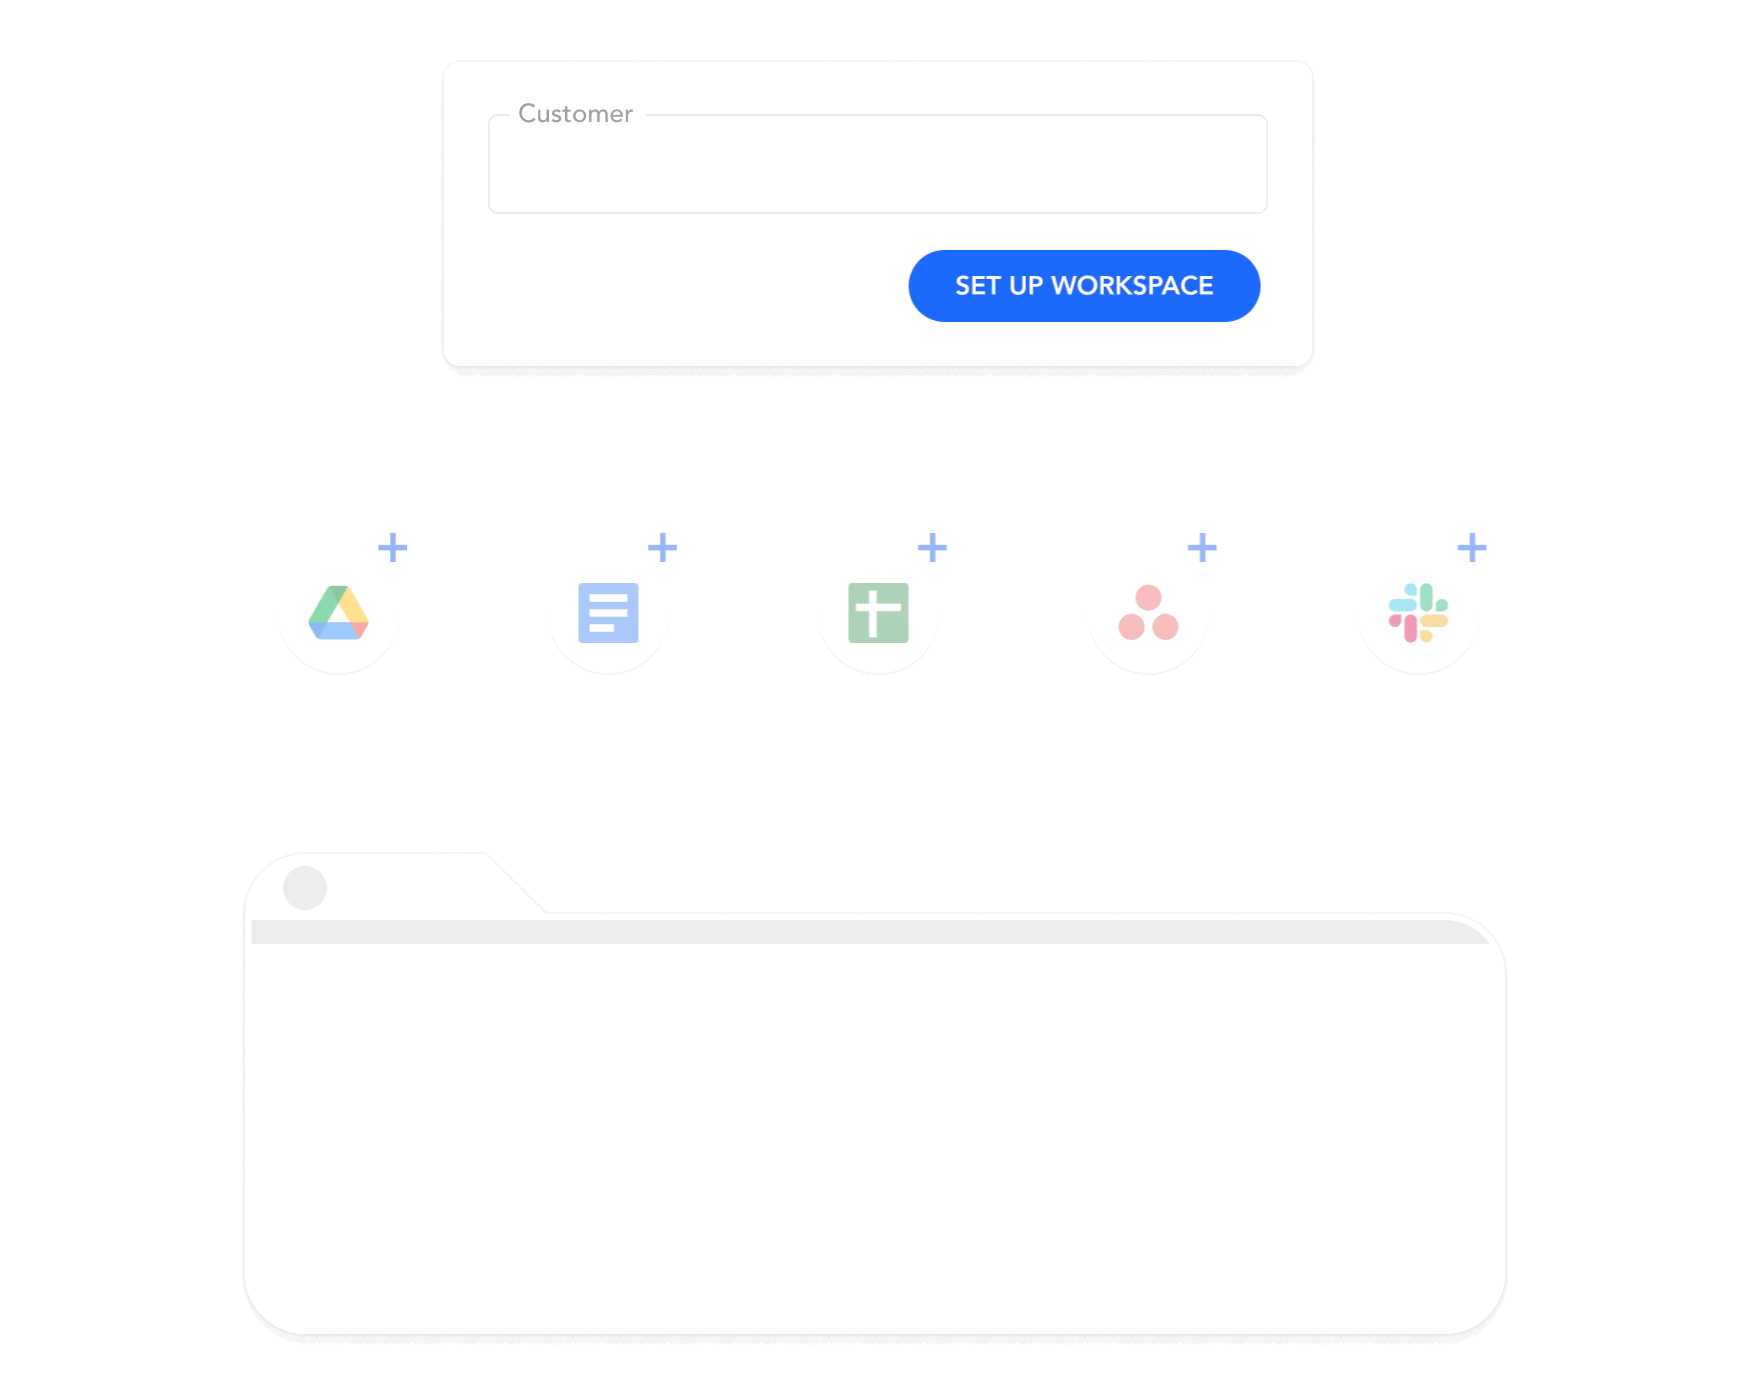
Create a space template automation
Add a space template automation to your space template to automatically create the Google Docs, Sheets, Slides, Google Drive Folders, Slack Channels, task lists, & other app objects that you need for each project.

-
Edit the space template you want to add the automation to.
-
In the template editor sidebar, navigate to the
Auto-created space contentsection. -
Configure the Create or look up something in another app section:
-
Select the app object you'd like to create/look up when each space is created. Note that if you've already set up existing automations, you'll need to click the
What else do you want to createbutton first. -
You may be prompted to connect the app to Workona at this point if you haven't done so already.
-
Fill out any required fields:
-
Name: Specify what you want the name of the created app objects to be.
- We highly recommend inserting at least one property within the name (e.g.
{{Client Name}}). See the How space template automations work section for more information and examples.
- We highly recommend inserting at least one property within the name (e.g.
-
Location: If applicable, specify the location where you want to create the object (e.g. the
Google Drive Parent Folder, theAsana Team, etc.). -
Permissions: If applicable, specify the permission you want to grant (e.g.
Anyone at acme.com can edit,Anyone with the link can view).
-
- How to look up existing app objects: Space template automations will automatically de-deduplicate app objects. When each space template runs, if we find an object with the same name in the same location, the existing app object will be used. For example, if a client's folder already exists in Google Drive, that existing folder will be used, rather than creating a duplicate. However, if no client folder is found, one will be created.
-
-
Configure the Save it to the space section:
-
The created app objects will be saved to the generated spaces by default.
- For example, let's imagine a
Client space templatethat auto-creates a Google Drive folder named{{Client Name}}. If we were to fill in "Acme" in the Client Name field during space creation, by default the createdAcmeGoogle Drive Folder would be automatically saved to theAcmeclient's space. - If you only want the app objects to be created, but not saved to the space, uncheck the
Save to spacecheckbox.
- For example, let's imagine a
-
Specify where in the space you want the created app objects saved.
- All app objects can be saved as a resource within the generated spaces. Select a resource section to do so.
- Google Drive Folders can also be embedded within the generated spaces. Alternatively, they can be created within any other auto-created Google Drive Folder in the space template.
- Asana Projects & Trello Boards other task lists can additionally be saved to the
Tasksview in the header of generated spaces. - Slack Channels can additionally be saved to the
Chatview in the header of generated spaces.
-
-
Click the
Save Automationbutton.
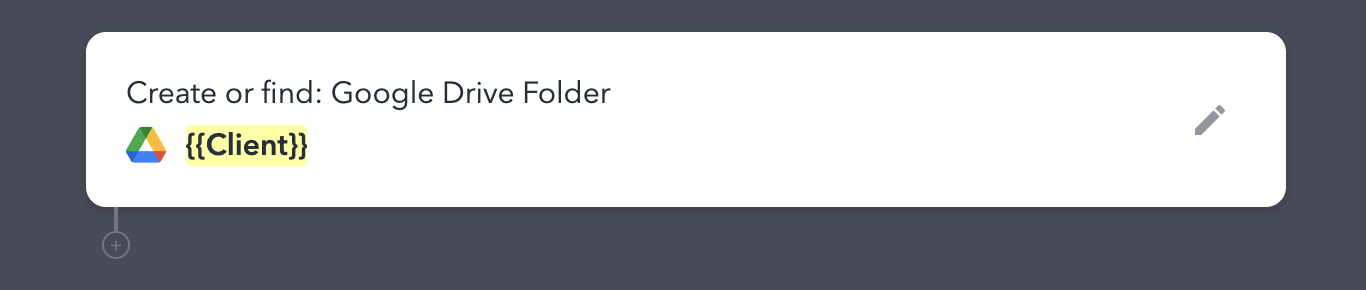
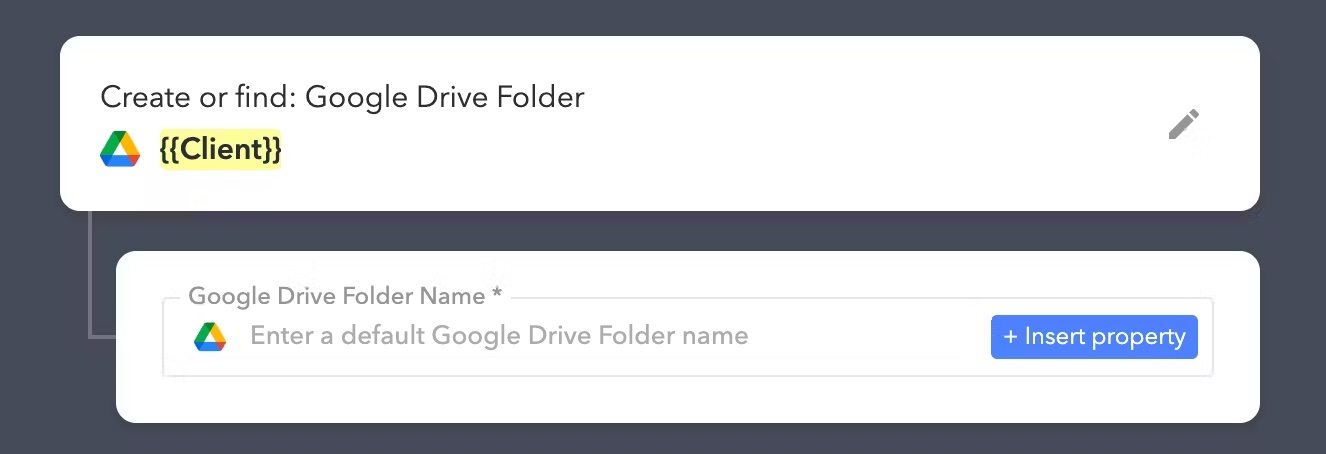
Using properties within space template automations
The role properties play for automations
Properties are a critical component of how space template automations work. To explain how they’re used, let's take a simple example of a Client space template that automatically creates the client's Google Drive Folder.
If you were to set up an auto-created Google Drive Folder's name to be Client, then every client space would contain a folder called Client. That's certainly not what we want.
But if you were instead to set up the auto-created Google Drive Folder's name to include a property called {{Client Name}}, then the folder's name would become dynamic, and would be determined by what's entered into that property field when you create a new space.
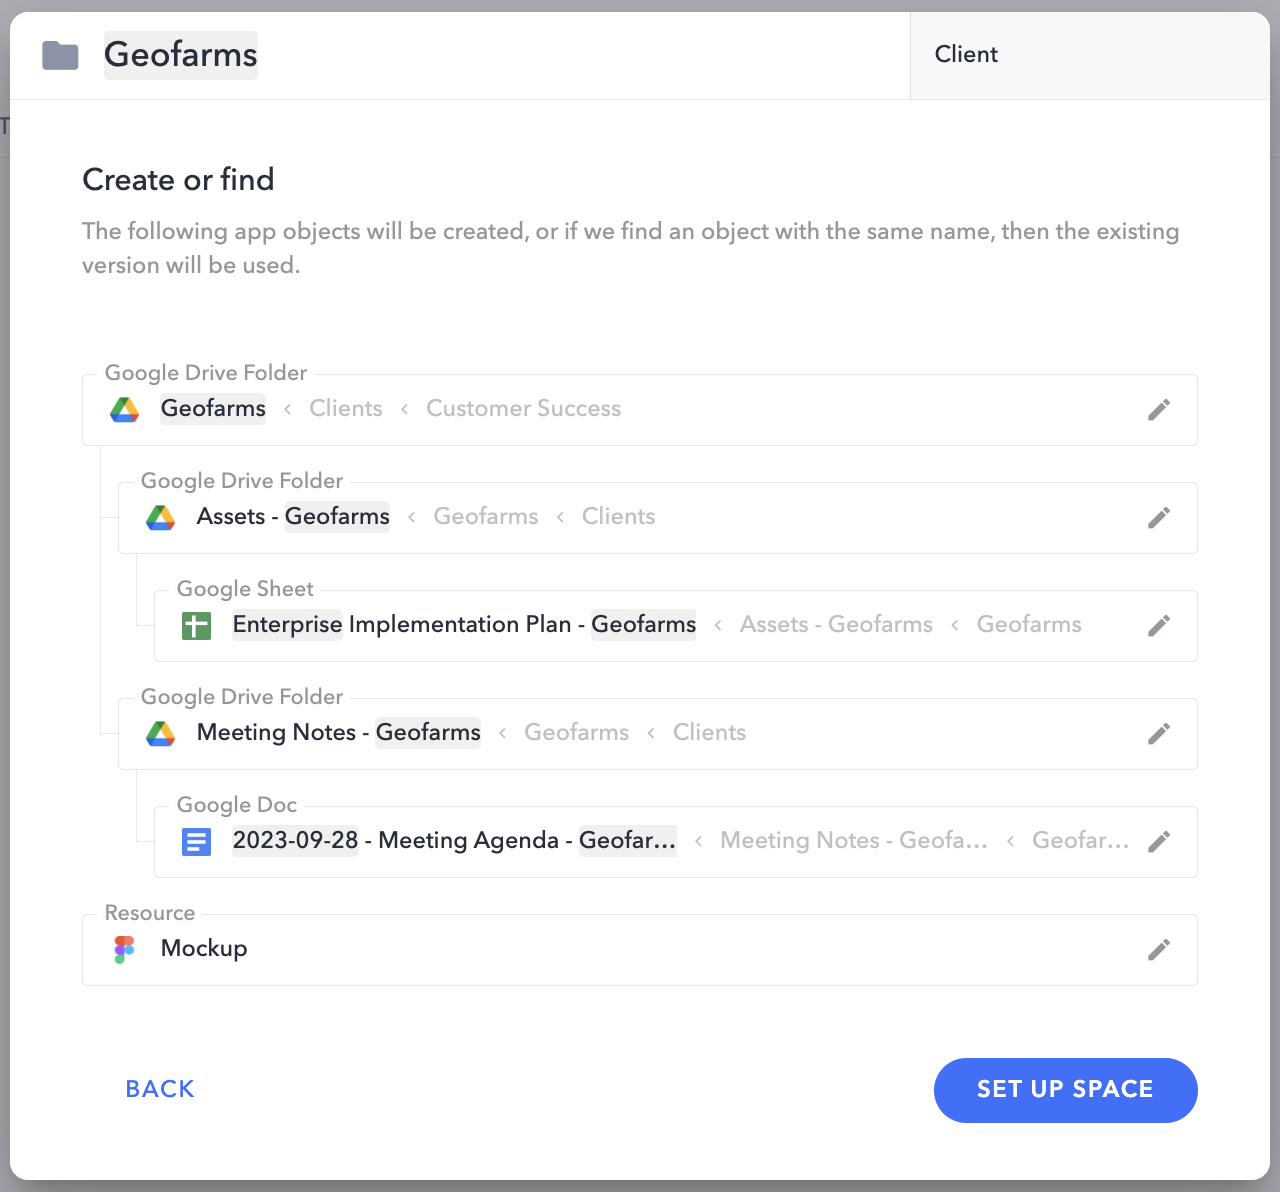
Build out a nested folder structure in Google Drive
You can easily build out the subfolders and docs within an auto-created Google Drive Folder visually from the list of automations.
Once you've set up a Google Drive Folder automation, you'll see a line extending from the bottom of it with a + button that allows you to create a subfolder or doc within that folder:
If you want to create a subfolder, select Google Drive Folder, and you'll be able to provide the subfolder's name right there in the list of automations. This makes building out a complex folder hierarchy a breeze!
You can then create additional subfolders, Google Docs, Sheets, or Slides directly within that subfolder by clicking the + that appears under it:

The folder hierarchy will also appear in the automation preview step when creating spaces from the space template:
Use conditional logic to set up spaces differently based on their properties
Sometimes there are docs or other space content that you only want to create within spaces that have certain properties. Conditional logic is the right tool for the job.

For example, there might be a Google Doc that's only created for Enterprise clients. Let's walk through how you might set that up:
-
Create or edit the automation that you want to add conditional logic to (e.g. the auto-created Google Doc for Enterprise clients).
-
In the When a space is created from the space template... section, click the
+ Conditional logicbutton. -
Create or select the property that you'd like to use to limit the space content (e.g.
Subscription Levelproperty).- Conditional logic currently only supports single-select fields, but support for additional types of fields is planned.
-
Specify the value of the property field that you want the spaces to have (e.g.
Subscription Level = Enterprise) -
If you want to add multiple required conditions, click the
+ Conditionbutton and repeat the process above.- Conditional logic currently only supports
ANDlogic (i.e. content will only be created when all conditions are met), but support forORlogic is planned.
- Conditional logic currently only supports
-
The auto-created content will only be conditionally created within spaces that meet the requirements you defined (e.g.
Subscription Level = EnterpriseANDCRM = Salesforce)
Conditional logic currently only applies to auto-created content, but support for conditionally defining resources, notes, tasks, & sections within spaces is planned.
Add or edit dynamic resources
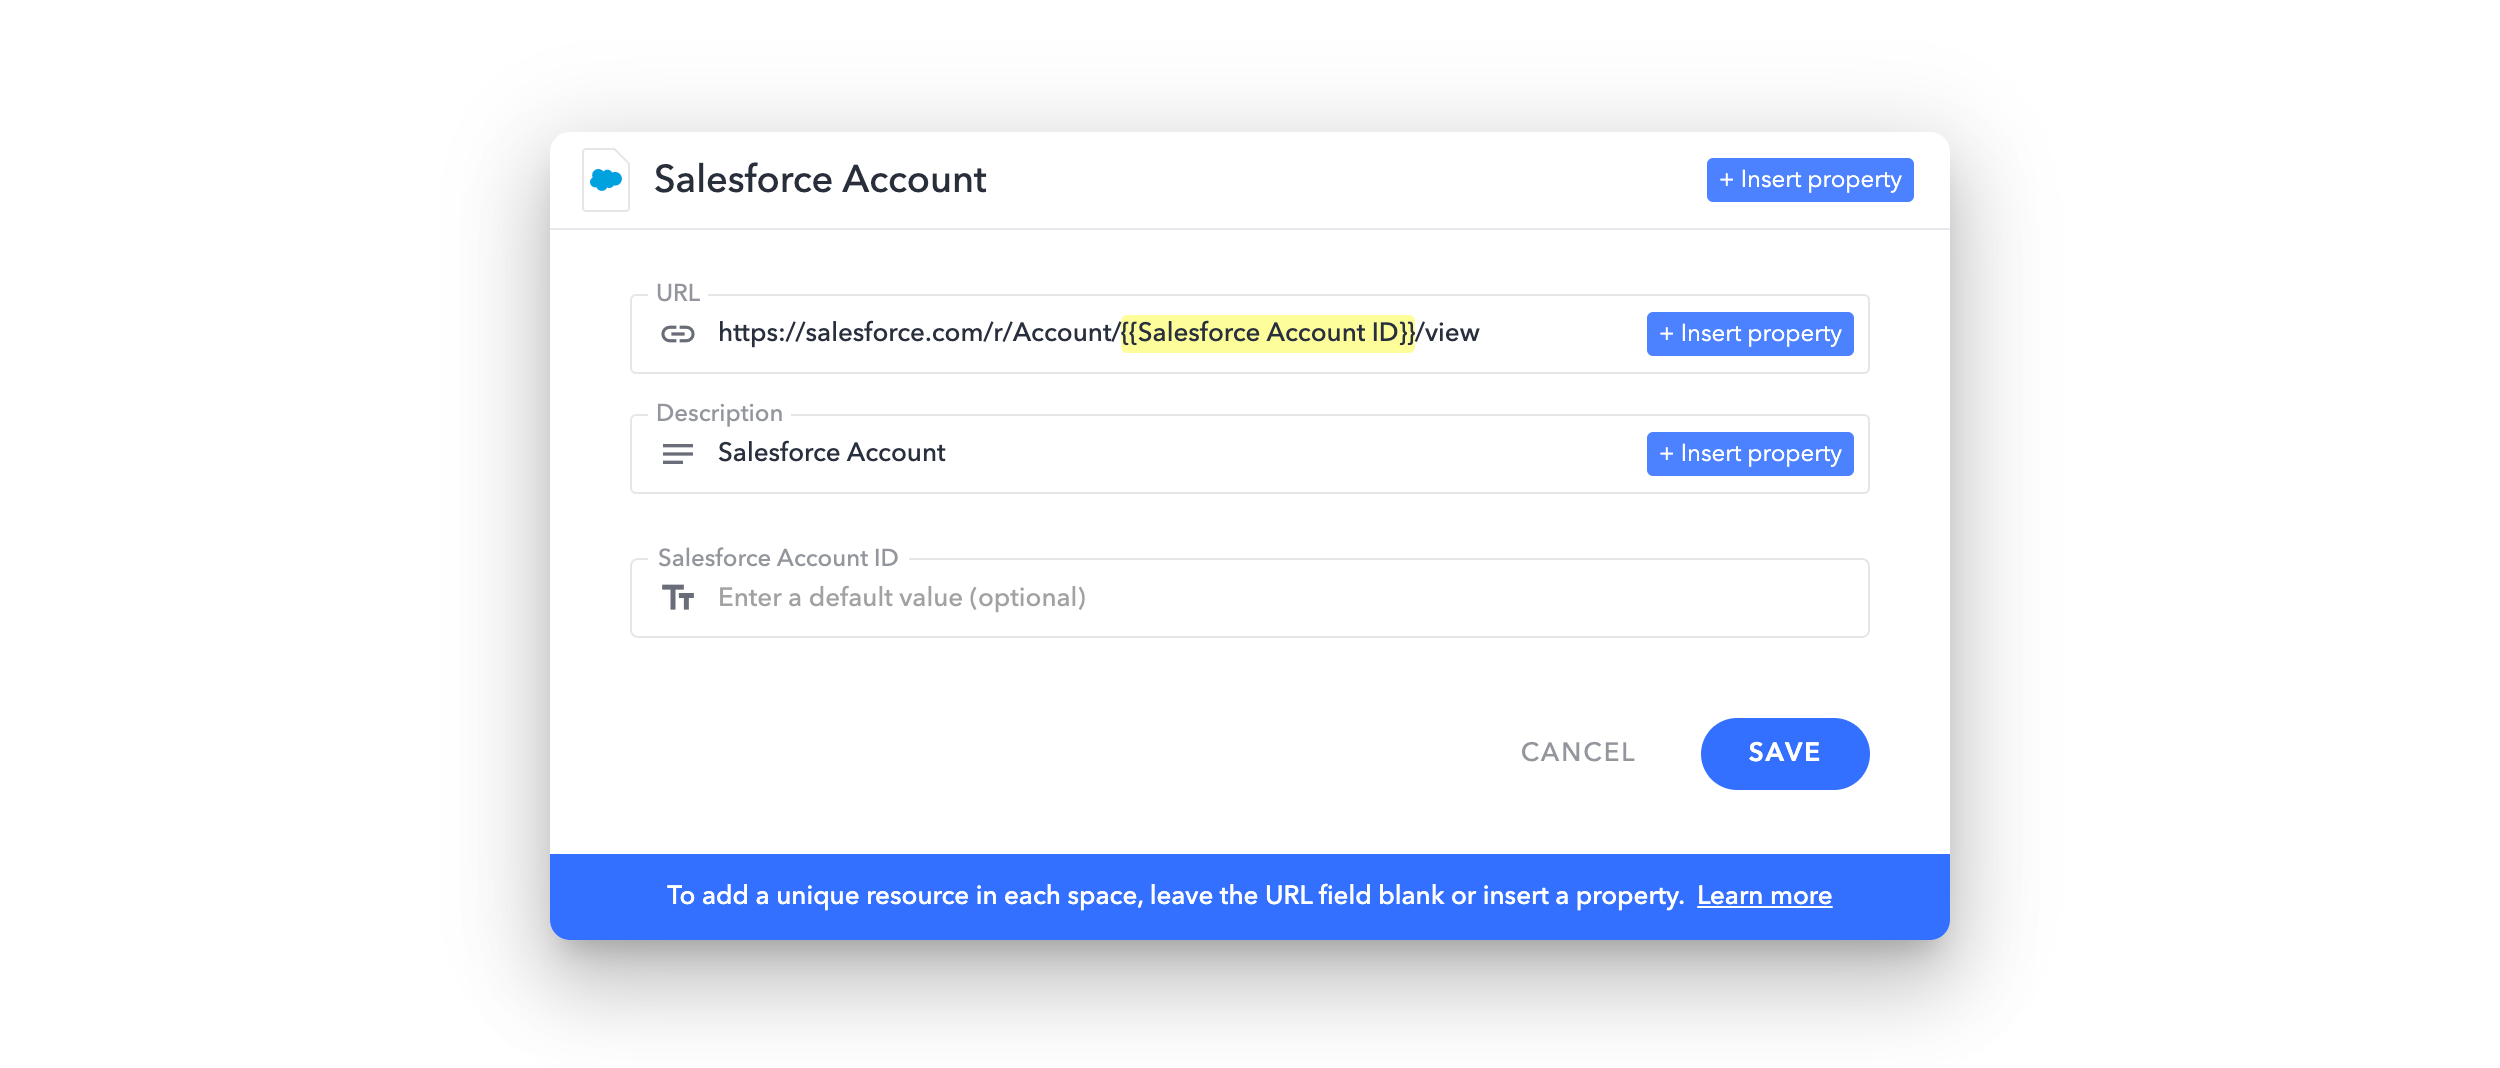
Dynamic resources are just like normal resources (i.e. similar to a bookmark), but their name & URL can be different in each generated space.
To make a resource dynamic, simply leave the name or URL field empty, or insert a property into either of those fields.
- If you leave a field blank, you'll fill in the field when you create each space.
- If you insert a property into a field, you'll fill out the property's field when you create each space.
For example, you might create the following dynamic resource:
| | | |
| --- | --------- | ----------------------------------------------------------------- |
| | Name: | Customer Salesforce Account |
| | URL: | https://salesforce.com/r/Account/{{Salesforce Account ID}}/view |
When you create a space from that space template next time, you'll have an opportunity to provide the Salesforce Account ID that's used to populate the resource's URL:
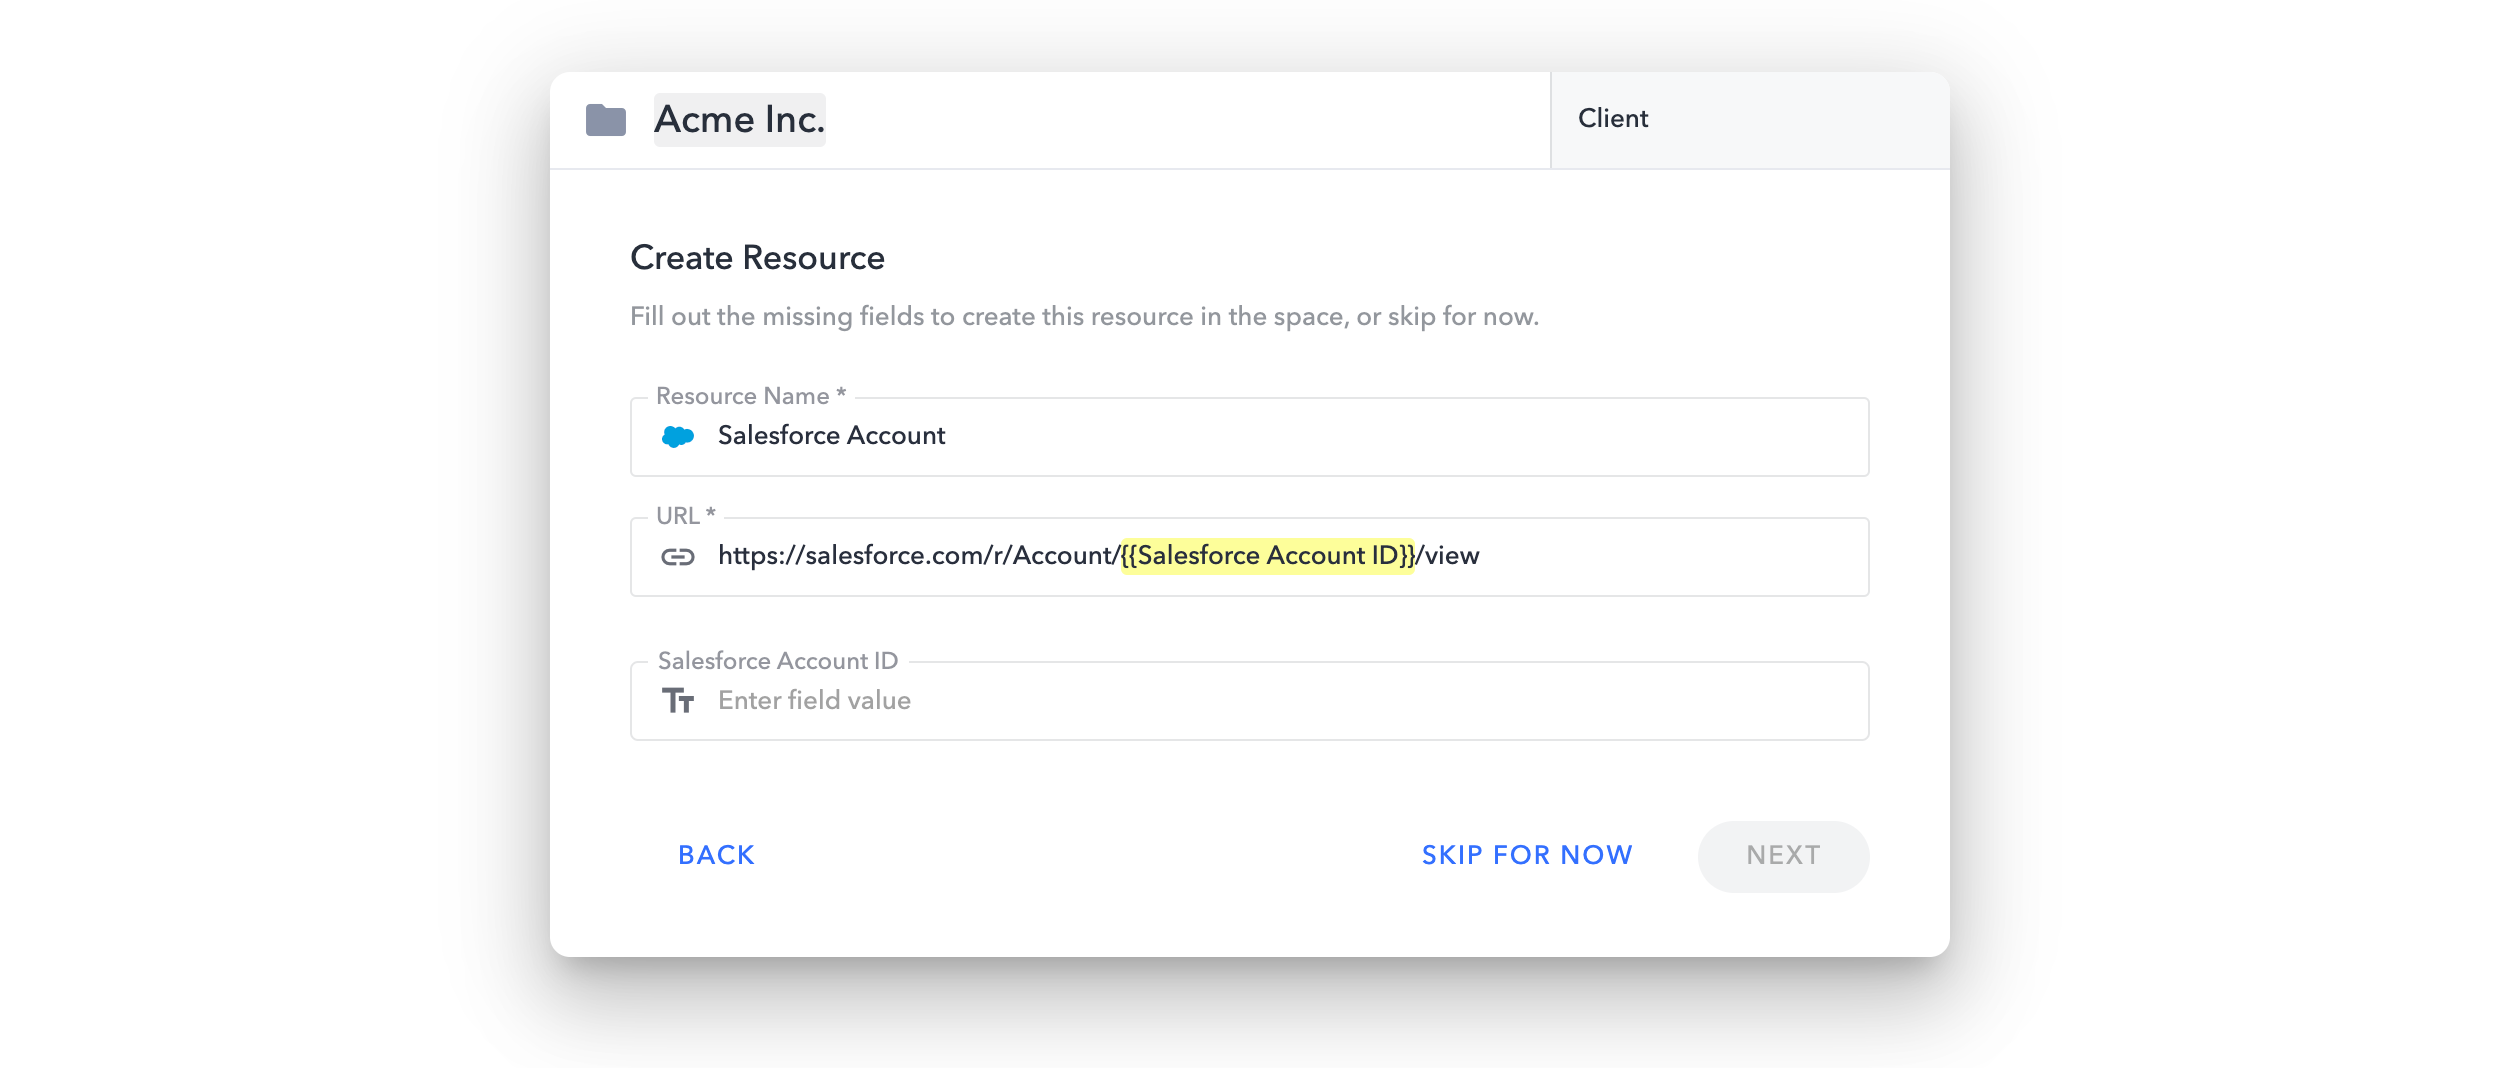
The created space will then contain a link to that specific customer's Salesforce Account:
| | | |
| --- | --------- | ------------------------------------------------- |
| | Name: | Customer Salesforce Account |
| | URL: | https://salesforce.com/r/Account/123456789/view |
To add a dynamic resource
-
Edit the space template you want to add a dynamic resource within.
-
Navigate to the Space content section in the sidebar.
-
Click the
New Docbutton in the upper right of the resource section you want to add the dynamic resource to. -
Click
New Dynamic Resource. -
Fill in the Resource Name and, optionally, the URL field.
- If you enter text into the field, that text will always be the same in every generated space.
- If you insert properties into a field, you'll be able to provide the properties' values when you create a space from the template.
- If you leave the URL field blank, you'll have an opportunity to fill out the field when you create a space from the template.
Edit a space template automation

-
Edit the space template you want to edit the automation within.
-
In the template editor sidebar, navigate to the
Auto-created space contentsection. -
Click an automation to edit it.
-
Edit the automation's settings as desired:
- See detailed instructions for the Create or look up something in another app and the Save it to the space sections here.
-
Click the
Save Changesbutton that appears below the automation steps (you may need to scroll down to see it).
Delete a space template automation

- Edit the space template automation you want to delete.
- Click the
Delete Automationbutton that appears below the automation steps (you may need to scroll down to see it). - Confirm the deletion.
Run space template automations during space creation
Once you've set up an automation within a space template, the next time you create a space from that space template, you'll be prompted to run the automation (i.e. create the app object).

High-level explanation
When you create a space from a space template that has an automation configured, this is a high-level summary of the steps involved:
- Step 1: Fill out any property fields, then click
Next. - Step 2: Review & confirm the app objects that will be created.
- Step 3: Click
Set Up Space. The space will be created, then the automations will run, and the created app objects will appear in the space.
Detailed explanation
Let's compare the space creation flow with and without automations to better understand how the flow changes.
-
Steps when creating a space from a template:
- Step 1: Fill out the space name field & any property fields, then click
Create.
- Step 1: Fill out the space name field & any property fields, then click
-
Steps to creating a space from a template that has automations configured:
- Step 1: Fill out the space name field & any property fields, then click
Next. - Step 2: If information that's required to create an app object is missing (e.g. a property field hasn't been filled out), an intermediate step will appear to collect that information. Click
NextorSkipto proceed. Skipped automations can be completed later. - Step 3: Review the app objects that will be created when the automations run (and make changes if desired), then click
Set Up Space. - Step 4: The space will be created, then the automations will run (in the correct order, in the case of dependencies) and will either succeed or display an error message. Any automations with errors can be retried, or skipped. Finally, the created app objects will appear in the space, unless you specified that they not be saved in the space.
- Step 1: Fill out the space name field & any property fields, then click
Finish creating a pending resource within a space

When an automation is skipped during space creation, a pending resource will appear within the space in the same location the resource would have appeared had the automation not been skipped.
To finish creating a pending resource:
- Click on the pending resource.
- Fill out any required fields.
- Click
Createto run the automation (if applicable).
Pending resources make space template automations far more flexible & reliable. They not only allow for cases where you don't have the information required for an automation when creating the space, but they also allow you to easily troubleshoot & re-run automations in case of errors.
If you ever have trouble running an automation and aren't sure how to resolve the issue, reach out to our support team for help.