
How To Create Google Doc w/ Fillable Fields
One of the most common questions for Google Docs is “How do I add fillable fields?” Whether you're inputting customer feedback, survey responses, or account information, a simple fillable field can do the job. Adding fields to a Google Doc sounds like it would be easy, but it’s more complicated than you might think. We'll show you the easiest workarounds to make your Google Docs fillable.
How to add fields:
There are two ways to add fillable fields to your Google Docs, depending on your use case:
- You want blank text fields - the fields will be filled out by whoever you send the doc to, e.g. you’re sending a customer feedback survey. How to add fields with a table in Google Docs →
- You want customized text fields - the fields are filled out by you or your team in order to customize the document, e.g. you’re preparing a client invoice statement. How to add fields via Workona →
1. Get fillable fields via tables
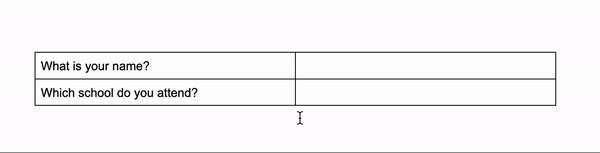
If you’ve ever seen a sleek-looking form in Google Docs, it was likely a table. It’s easy to use tables in Google Docs to create blank text fields, which are actually just cells in the table. Here’s how to format a table with fillable fields in your doc:
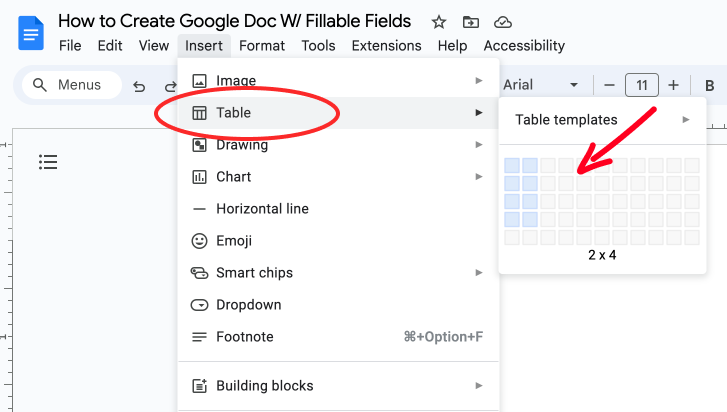
- Open a Google Doc and place your cursor where you want to insert the fields. Go to the
Insertmenu at the top and selectTable. - Click and drag to select the size of the table, based on the number of fillable fields you need. (Later, you can add or remove rows and column by right-clicking the table.)
- Once the table is inserted, click inside a cell where you want to create a fillable field.
- Go to the 3-dot menu in the top right and select
Table options>Table properties.

- In the
Table propertiesdialog box, select a color to differentiate the fillable fields from the rest of the text. - Click
OKto apply the color to the selected cell, and repeat for other cells where you want to create a fillable field. After creating all the fillable fields, go back to theTable propertiesdialog box.
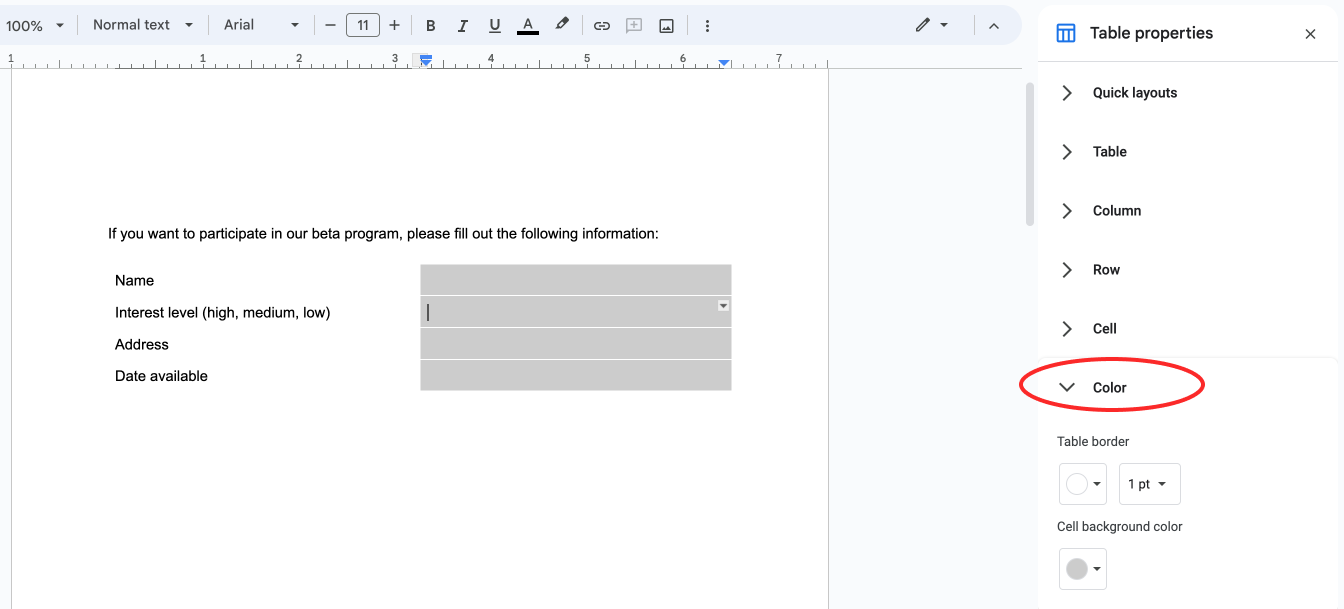
- Navigate to the "Table border" section and choose a white color to format the border around the table. (Other colors are fine too, but this creates a clean look.)
- Click
OK. - Select
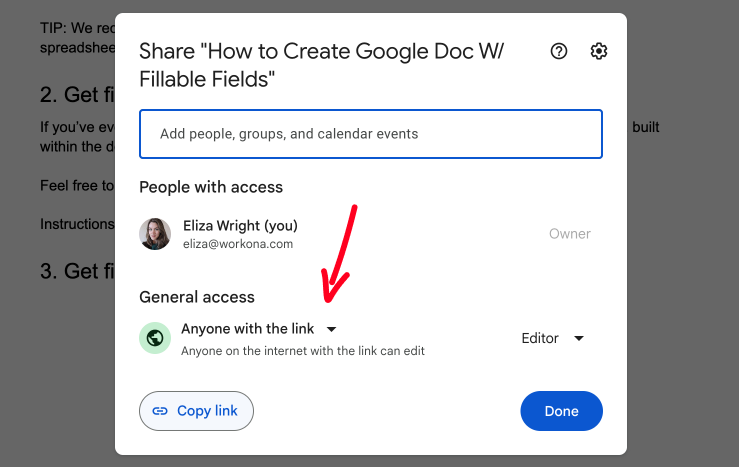
Share>Anyone with the link can edit, or a similar permission level that allows your audience to fill out the fields.
How to get a fillable line in Google Docs
Maybe you want to insert a solid line to make it clear where the blank text field begins, i.e., where your audience should start typing their answers. Here’s how:
- Open a Google Doc and place your cursor where you want to insert the fields.
- Go to the
Insertmenu at the top and selectTable. Choose the size of the table based on the number of fillable fields you need (later, you can add or remove rows and column by right-clicking the table). - To change the row width (so your line begins at the right place), hover over the horizontal line until a double arrow icon appears, then click and drag.
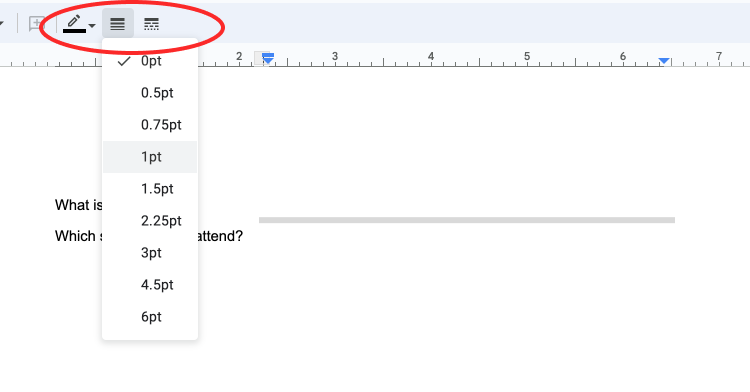
- Click inside the table to select it, then go to the 3-dot menu in the top right and select
Table options>Table properties. Or, you can click the border width table in the menu. - Set the border width to 0 pt.

- Hover over the bottom of the cell where you want the line to appear so only the bottom line is selected.
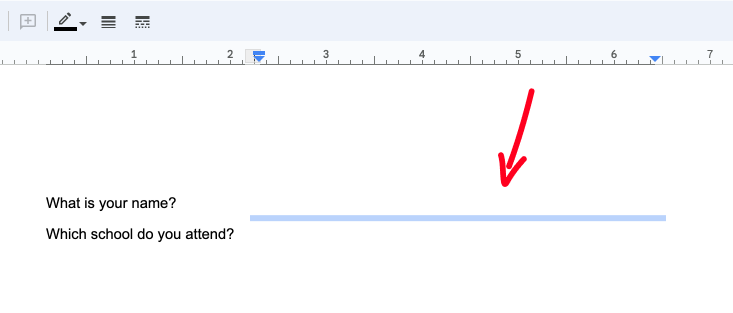
- Select the border width menu and set the border width to 1 pt. This will only apply to the line you selected.
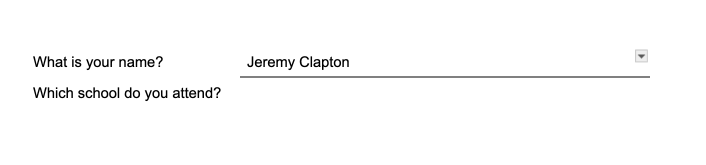
- Now you have a line which indicates where your respondents should start typing their answers in each field.
2. Get fillable fields via Workona
You might be thinking, “I don’t want blank fields; instead, I want to swap out the content of the fields depending on context.” Or, maybe you want to empower your team members to swap out the content of these dynamic fields.
The easiest way to fill and replace content in a Google Doc is with the built-in feature of find and replace. But there are a few problems with this method:
- It’s tedious and manual — if your Google Doc has dozens or more fields to customize, you’ll get sick of this method pretty soon.
- There’s no easy way to standardize or share your process with team members.
The simple and scalable solution is using Workona to insert fillable fields (we call them properties) in Google Docs. Here’s how it works:
- Sign up for Workona here.
- Create a doc template from the Google Doc you want to customize with fillable fields.
- Follow these steps to add properties to your doc templates with curly braces or handlebars, e.g.
{{ Property name }} - Now every time you use the doc template, a new Google Doc will be generated with all the properties filled in (based on your input).
- Optional - Create a Workona team to share doc templates with team members.